Introduction
Microsoft Word has a wide variety of templates that can be used to make documents as per the requirements of the user, including index cards. However, if someone is using an old version of Microsoft Word or if they simply prefer making things from scratch, they can easily create index cards without using a template. With a few simple steps, anyone can make an index card on Microsoft Word without a template.
Why make index cards in Microsoft Word without a template?
While Microsoft Word offers templates for various types of documents, including index cards, not all users may have access to them, especially if they are using an older version of the program. Making index cards from scratch can also give users more creative freedom to customize them as per their needs. Moreover, making an index card from scratch helps users learn the fundamentals of formatting and designing a document, which can be beneficial in the long run.
Benefits of creating index cards on Microsoft Word
Index cards are one of the best tools to organize information and aid memory recall due to their simplicity. Creating index cards on Microsoft Word can have several benefits, including:
Ease of modification:
The user can easily make changes to the index card as they require without the need for redoing any work.
Save time:
Index cards can be created quickly in Microsoft Word with the desired format and design.
Environment-friendly:
Creating index cards digitally on Microsoft Word eliminates the need for physical index cards, saving paper and ink.
Ease of sharing:
Once an index card is created on Microsoft Word, it can be shared digitally with others without any physical transfer of cards.
Therefore, creating index cards on Microsoft Word without a template offers several benefits and is an easy process. With a little bit of effort, anyone can create index cards that are useful for organizing information and aiding memory retention.
Check the Printer Settings
Importance of checking printer settings before printing index cards
Before printing index cards, it is essential to check the printer settings to ensure that the printout is clear, accurate, and aligned correctly. An improper index card printout can be frustrating and can lead to wastage of time and resources. Therefore, it is essential to understand the printer settings and how to adjust them to match the index card needs.
How to print index cards using NoteDex or Word
Printing index cards can be done using two primary options: either using NoteDex or Word. For those who prefer using Word, you may encounter difficulty getting Word to print on the correct paper size. Therefore, it is necessary to follow a template, which guarantees accuracy and speed. NoteDex, on the other hand, provides a dedicated app that makes printing index cards an easy task.
Instructions for printing index cards using NoteDex or Word
Step 1: Generate the PDF file
The first step is to generate the PDF file of the index cards. Once the PDF file is generated, open it and check the page setup to ensure that it is correct.
Step 2: Check printer settings
The next step is to check the printer settings to ensure that they match the index card needs. This includes making sure the landscape orientation is correct, paper sizes align, and double-sided as needed.
Step 3: Print the index cards
Once all the settings are adjusted correctly, it’s time to press the print button. The printer should start printing the index cards. After printing, check the results to ensure that everything is accurate and aligned correctly.
Using Index Cards for Brainstorming or Studying
Index cards can be great tools for brainstorming, studying, or arranging ideas. Printing the cards yourself ensures that they are customized to your needs, including the size, font, and color. Once you print your index cards, you can use them in several ways, such as:
– Jotting down ideas: index cards make it easy to jot down ideas. You can categorize them according to their importance or theme.
– Learning new vocabulary: You can use index cards to learn new vocabulary words. Write down the words and their meanings on the index cards.
– Studying for exams: Use the index cards to remember key points, quotes, and figures on a specific topic.
Therefore, printing index cards can be an easy task. You can use Word or NoteDex to generate custom index cards. Regardless of the method you choose, it is crucial to check the printer settings to ensure accurate and aligned index cards. By doing so, you can make the most out of your index cards and use them for brainstorming, studying, or organizing your ideas.
Creating a New Document
Step by step process to create a new document in Microsoft Word
Microsoft Word is a popular word processing software used by millions of people worldwide. Creating a new document in Word is a fundamental task that users must know to start working on their documents. In this section, we will discuss the step-by-step process of creating a new document in Microsoft Word.
Step 1: Launch Microsoft Word
To start creating a new document, first, launch Microsoft Word. Go to the Start menu and search for Microsoft Word. Click on the app to open it.
Step 2: Select a Blank Document or Template
Once Microsoft Word opens, you will be presented with two options to create a new document. You can either select a Blank Document or choose from a variety of professionally designed templates for Word.
Step 3: Start Typing
If you choose to create a Blank Document, a new document will open up, and you will be able to start typing right away. You can type anything you want, such as a letter, essay, or report.
Step 4: Save the Document
It is crucial to save the document after you have finished typing. To save the document, click on the “File” menu on the top left corner of the screen, then select “Save As.” Choose the location where you want to save the file, give it a name, and then click on “Save.”
Step 5: Close the Document
After you have saved the document, you can close it by clicking on the “X” button on the top right corner of the window.
How to use templates in Microsoft Word
In addition to creating a blank document, Microsoft Word also offers a range of professionally designed templates that users can choose from to make their documents more visually appealing.
Step 1: Launch Microsoft Word
Launch Microsoft Word from the Start menu or desktop shortcut.
Step 2: Choose a Template
Select “New” from the “File” menu, and you will be presented with a range of templates that you can choose from. You can search for specific templates in the search bar or browse through the categories such as Resumes, Brochures, Reports, etc.
Step 3: Customize the Template
Once you have selected a template, you can customize it to fit your needs. You can add or remove text, change the font, colors, and images.
Step 4: Save the Document
After making the necessary changes, save the document by clicking on the “File” menu and then selecting “Save As.” Give the file a name and choose the location where you want to save it.
Step 5: Close the Document
After saving the document, you can close it by clicking on the “X” button on the top right corner of the window.
Therefore, creating a new document in Microsoft Word is a simple process that anyone can learn. Users can choose to create a blank document or select a template from a variety of options. Following the step-by-step process can save time and ensure that the document is saved securely. Users can also customize the template to meet their requirements and make their documents more visually appealing.
Using the Search Field
How to use the search field to find Index Card templates in Microsoft Word
If you are using Microsoft Word, you can easily create index cards using the built-in templates. The templates provide a variety of options to choose from, including business card size, one flashcard per page, and five flashcards per page. To access these templates, you can use the search field to narrow down your options. Here is how to go about it:
Step 1: Open Microsoft Word
The first step is to open Microsoft Word on your computer. Once opened, you can click on the “File” tab located at the top left-hand side of the screen.
Step 2: Select “New”
After clicking on the “File” tab, select the “New” option. It should be located on the left-hand side of the screen.
Step 3: Type in the search field
In the middle of the screen, you will notice a search field. Type in “Index Cards” and press enter.
Step 4: Select a template
Once you have typed in the search field, Microsoft Word will display a list of available templates. You can scroll through the options and select the one that best suits your needs. If you are not sure which template to choose, you can click on “See More Templates” right below the list to get more options.
Comparing NoteDex and Word
While both NoteDex and Word are useful tools for creating index cards, they differ in the ease of use and customization options. For instance, NoteDex provides a dedicated app that makes it easier to create and print index cards. It allows the user to choose the font style and size, add images and borders, and customize the card colors. Word, on the other hand, provides a variety of templates to choose from, but it may require some adjustments to suit your needs.
Printing Index Cards using NoteDex
Printing index cards using NoteDex is straightforward and requires only a few steps. Here is how to go about it:
Step 1: Open NoteDex
The first step is to open the NoteDex app on your computer.
Step 2: Create your Index Card
Choose the format and customize the index card to your preferences. You can choose the font, size, and color. Add images, graphics, or borders to make your index card more appealing and effective.
Step 3: Print your Index Cards
After customizing your index card, click on the “Print” button located at the top right-hand side of the screen. Ensure that the correct printer is selected, and all the settings are adjusted accordingly.
Conclusion
Creating and printing index cards has never been easier with the tools available today. Both NoteDex and Microsoft Word provide useful templates and customization options that can be customized to fit your needs. Before printing the cards, always check the printer settings to ensure accuracy and alignment. Index cards are versatile tools that can be used for brainstorming, studying, or organizing ideas. With the above steps, printing and using index cards has never been easier.
Microsoft Word
Index Card Templates
Microsoft Word provides built-in templates for creating professional-looking index cards quickly and easily. Users have the option to choose from a variety of templates, including business card size, one flashcard per page, and five flashcards per page. These templates offer a range of customization options to ensure the cards are tailored to the user’s specific needs.
Features and benefits of using index card templates in Microsoft Word
Not only can the user create professional-looking index cards, but they will also save time and effort when they use the templates in Microsoft Word. Typing in the search field is an efficient way to find the desired template quickly. Moreover, users can browse through the available options and select the one that best suits their needs. The templates not only provide an attractive appearance but can also be customized for font style and size, images, and borders. These features make the templates more versatile when it comes to brainstorming, studying, or organizing ideas.
NoteDex is another tool for creating index cards, but it differs from Microsoft Word regarding its ease of use and customization options. NoteDex comes with a dedicated app that enables users to create and print index cards effortlessly. While it offers the possibility to choose the font style and size, add images and borders, and customize the card color, it requires users to adjust the templates for their needs.
Printing index cards using NoteDex is straightforward and requires a few steps to accomplish. First, open the NoteDex app on your computer. Next, choose the format and customize the index card to your preferences. Finally, print the index cards using the “Print” button at the top right corner of the screen, ensuring that all printer settings are correctly adjusted.
Therefore, index cards are versatile tools that help organize and condense information into its critical points. Microsoft Word templates provide an easy to use, customizable, and quick way to create professional-looking index cards in a matter of minutes. Additionally, NoteDex offers another option for creating index cards with its dedicated app, allowing for easy customization and printing. With the steps outlined above, creating and printing index cards has never been easier.
The Hard Way
Using Microsoft Word, Excel, and Google Docs with Avery template format
If you are trying to create index cards using Microsoft Word, Excel, or Google Docs, you may find that it takes more time and effort than using a dedicated app. These apps were not designed for creating index cards, and you may have to spend a lot of time formatting and positioning text, which can make you less productive. Additionally, while Avery template format can be used, it does not provide as many customizable options as other apps.
How to Create Digital Index Cards
To create digital index cards, you can use the NoteDex app. NoteDex allows you to create, organize, share, and print index cards on all of your devices. Unlike the above apps, NoteDex is specifically designed for creating notecards and flashcards, and it offers a streamlined and intuitive experience.
Comparing NoteDex and Word
While both NoteDex and Word can be used for creating index cards, they differ in the ease of use, customization options, and functionality. NoteDex provides a dedicated app that is simpler to use and offers more customization options, including the ability to choose font style and size, add images and borders, and customize the card color. Word, on the other hand, provides a variety of templates to choose from, but it may require some adjustments to suit your needs.
How to make Index Cards in Microsoft Word
To create index cards using Microsoft Word, you can use the built-in templates. The templates provide a variety of options to choose from, including business card size, one flashcard per page, and five flashcards per page. To access these templates, you can use the search field to narrow down your options. Once you have found the template that suits your needs, you can customize it to fit your preferences.
How to make Index Cards in Google Docs
We recommend that you do not attempt to create index cards using Google Docs since the app was not designed for that purpose. If you try to create index cards in Google Docs, you may find it time-consuming and frustrating since it does not offer the same level of customization as NoteDex.
Printing Index Cards using NoteDex
Printing index cards using NoteDex is a straightforward process. After customizing your index card, you can click on the “Print” button located at the top right-hand side of the screen. Ensure that the correct printer is selected, and all the settings are adjusted accordingly.
Creating and printing index cards is now easier than ever with the tools available today. NoteDex provides an easy-to-use interface and comprehensive customization options, making it the preferred option for creating, organizing, sharing, and printing your index cards.
Dedicated Index Card Apps
Why using a dedicated index card app is a better option and its features
If you are looking for a more streamlined and efficient way of creating and printing index cards, a dedicated index card app like NoteDex may be your best option. Unlike traditional apps like Microsoft Word and Google Docs, NoteDex is specifically designed for creating notecards and flashcards, making it a more intuitive and user-friendly option.
Additionally, NoteDex offers a range of features that you may not find in other apps, including the ability to add images and borders, customize card colors, and choose font style and size. These customization options make it easy to design cards that suit your needs and preferences, whether you’re using them for study, brainstorming, or creative projects.
Another advantage of using a dedicated app is that it can save you time and effort. With templates and streamlined workflows, NoteDex eliminates the need to spend hours formatting and positioning text, freeing up more time for you to focus on your actual work.
Overall, using a dedicated index card app like NoteDex can be a game-changer for anyone who needs to create, organize, and print index cards regularly. Its comprehensive customization options, easy-to-use interface, and time-saving features make it the preferred choice for many professionals, students, and creatives alike. So why not give it a try and see how it can improve your workflow and productivity?
Formatting Options
Page Layout, Landscape, and Other Formatting Options for Index Cards
When creating index cards, it’s essential to think about the formatting options to make sure they look professional and are easy to read. Here are some formatting options to consider:
Page Layout
The page layout determines how the index cards appear on the page. If you plan to print your index cards, you can choose between portrait or landscape orientation. Portrait orientation is suitable for index cards with short answers or questions, while landscape orientation is ideal for index cards with more extended questions and answers.
Font Style and Size
Choosing the right font style and size makes the index cards easy to read. Use a font that is legible, such as Arial, Times New Roman, or Calibri. The recommended font size for index cards is between 10 and 12 points.
Formatting Text
To make your index cards easier to read, you can format text using bold, italics, or underlining. Use bold for headings or important keywords and italics for emphasis. Underlining should be avoided since it may make the text harder to read.
Adding Images and Graphics
Including images, graphics, or charts can make your index cards more visually appealing and help illustrate concepts. However, avoid adding too many images or graphics that may clutter the index card and make it difficult to read.
Using Tables for Comparisons
Tables are an effective way to compare information, such as definitions, dates, or formulas. Use a table format to list information that needs to be compared side by side.
Print Settings
When printing index cards, check that your printer is set to the correct paper size and orientation. If you are using double-sided index cards, ensure that double-sided printing is turned on, so the question and answer appear on different sides.
So, formatting options such as page layout, font style and size, formatting text, adding images and graphics, using tables for comparisons, and print settings play a crucial role in creating professional-looking and easy-to-read index cards. Choose the right formatting options based on the content and purpose of your index cards.
Printing the Index Cards
After you have created your index cards and formatted them, it’s time to print them out. There are two ways to print index cards: using Word with an index card template or using a dedicated app like NoteDex. Here’s how to do it:
Generating and Printing the Final Index Cards from the Document
If you created your index cards using Word with an index card template, follow these steps to print them:
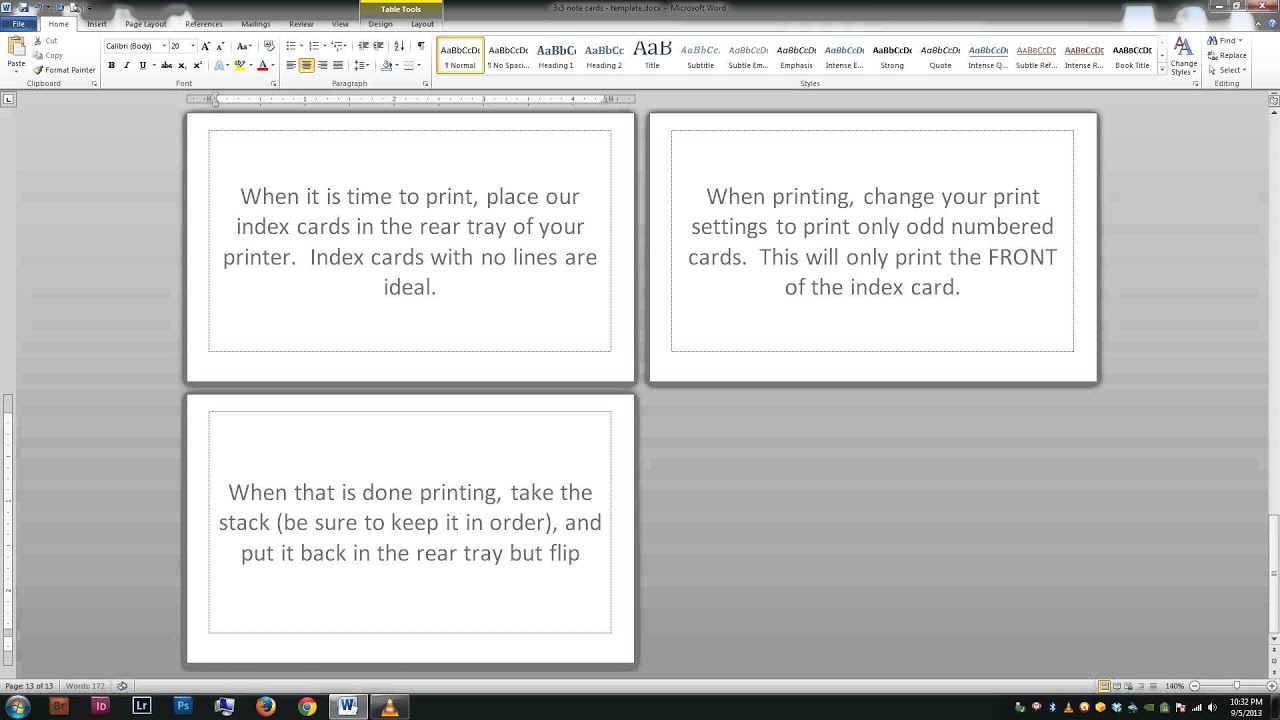
1. Open the template file in Word and edit the index cards as needed.
2. Load the index cards into your printer’s paper tray.
3. Go to the “File” menu and select “Print.”
4. In the print dialog box, select the correct paper size and orientation, i.e., portrait or landscape.
5. If your index cards are double-sided, select “Print on both sides” and “flip on short edge” to ensure that the questions and answers appear on different sides.
6. Click “Print,” and the index cards should start printing.
On the other hand, if you used NoteDex to create your index cards, follow these steps to print them:
1. Sign up or log in to https://NoteDex.app
2. Create your index cards in the app.
3. When you finish editing the index cards, save them as a PDF file.
4. In the print dialog box, select the correct paper size and orientation, i.e., portrait or landscape.
5. Choose the print format, i.e., one card per page or multiple cards per page.
6. Load the index cards into your printer’s paper tray and click “Print.”
Overall, printing index cards is an easy process, whether you use Word with an index card template or a dedicated app like NoteDex. Just make sure to check the print settings, paper size and orientation, and double-sided printing options to avoid any errors. Once printed, you can now hang them on your wall or keep them in your back pocket for brainstorming or studying.
Conclusion
Pros and cons of different methods to make index cards on Microsoft Word
Making index cards in Microsoft Word can be a useful way to organize and condense information into key points. There are different methods to create index cards, depending on your preferences and goals. Here are some pros and cons of the two most popular methods.
The first method is to use tables to create index cards. This method is suitable for comparing information, such as definitions, dates, or formulas. Tables provide a clear and organized way to compare information side by side. Tables are also easy to format and customize depending on the content of the index card. However, tables may not be the best choice if your index card contains long paragraphs or complex information. Also, tables are not as visually appealing as other formatting options, such as images and graphics.
The second method is to use text boxes to create index cards. This method is suitable for creating visually appealing index cards with custom-designed layouts. Text boxes allow you to place text and images anywhere on the page, providing more flexibility and control over the design. Text boxes are also easy to format, such as adding borders or shading. However, text boxes require more formatting work than tables, and they may not be suitable for comparing information.
Therefore, the best method to create index cards depends on your preferences and goals. Both tables and text boxes have their pros and cons, and the choice depends on the content and purpose of your index cards. Regardless of the method you choose, make sure to use formatting options such as font style and size, formatting text, adding images and graphics, and print settings to create professional-looking and easy-to-read index cards.


