Introduction
Flowcharts are an essential tool in visualizing and communicating complex processes and workflows in a simple, easy-to-understand format. With Microsoft Word, creating and customizing flowcharts has become more effortless, even for users with limited design skills. This blog post aims to guide users on how to make a flowchart in Word using different methods.
What is a flowchart and why is it important?
A flowchart is a visual representation of a process or workflow. It helps users understand the steps involved in a process and the relationships between them. A flowchart can be used to identify inefficiencies, bottlenecks, and redundancies in a process, which enables users to optimize and improve the process.
Flowcharts are essential in various industries, including business, engineering, healthcare, and education. In the business world, flowcharts are used to map out sales processes, project management workflows, and decision-making processes.
Different types of flowcharts
There are different types of flowcharts depending on the complexity of the process and the information to be conveyed. Here are some types:
– Basic Flowchart: This is the most common type of flowchart that shows a simple process or workflow.
– Swimlane Flowchart: This type of flowchart is used to illustrate the different departments or individuals responsible for each step in a process.
– Data Flowchart: This type of flowchart illustrates how data flows through a system or process.
– Process Map: This type of flowchart captures the flow of materials, information, and actions within a process.
Methods for making flowcharts in Word
Method 1: Using SmartArt graphics
One of the easiest ways to create a flowchart in Word is by using SmartArt graphics. Here’s how to do it:
1. Open a new Word document and click on the “Insert” tab.
2. Click on “SmartArt” in the Illustrations group.
3. Choose a flowchart or process graphic that best fits the process you want to show.
4. Enter your text in the graphic, and Word will automatically resize and reposition the shapes for you.
Method 2: Using basic symbols
If you prefer more control and customization options, you can manually create a flowchart in Word using basic shapes. Here are the steps:
1. Open a new Word document and click on the “Insert” tab.
2. Click on “Shapes” in the Illustrations group and choose a shape that best represents your process step.
3. Click anywhere in the document to add the shape, then add text to it by double-clicking on it.
4. Repeat steps 2 and 3 to add more shapes and text to build your flowchart.
5. Connect the shapes by adding lines or arrows between them. To do this, click on the “Insert” tab and select “Shapes” in the Illustrations group. Choose a line or arrow shape, then click and drag to draw it between two shapes.
Therefore, creating flowcharts in Word has become a straightforward process with the integration of SmartArt graphics and basic symbols. Users can choose a method that works best for them and customize the flowchart to their liking. Flowcharts are essential in visually communicating complex processes, and with Word, users can create them effortlessly.
Using SmartArt to Create a Flowchart
Creating a flowchart is an efficient way to visualize and communicate a process or system. Microsoft Office Suite offers different tools for creating flowcharts, and one of them is SmartArt. SmartArt is a built-in feature in Microsoft Word, Excel, and PowerPoint that offers a wide range of graphic templates for creating professional-looking diagrams, processes, and relationship charts. This blog will focus on how to use SmartArt in Microsoft Word to create a flowchart.
Inserting SmartArt in Word
To start creating a flowchart in Word using SmartArt, open a new Word document, and go to the “Insert” tab. In the “Illustrations” group, click “SmartArt.” This will open the “Choose a SmartArt Graphic” window. Here, you can browse through various SmartArt templates, or you can use the search bar to find the one you need.
Select the process option:
Once you have selected a SmartArt graphic, you will be prompted to enter the text for the different shapes. In the “Text” pane, which is located on the left side of the SmartArt graphic, you can enter the different steps, tasks, or events that you want to include in your flowchart.
Selecting the process option
For a flowchart, select the “Process” option from the SmartArt graphic types. This will provide you with a few different options for flowchart designs. Select the one that best suits your needs.
Adding and customizing shapes
Once you have selected a SmartArt graphic, you can add or remove shapes by clicking the “Add Shape” or “Remove Shape” buttons on the “SmartArt Design” tab. You can also add text to each shape by clicking on it and typing the text or using the Text pane.
To customize the appearance of the SmartArt graphic, you can use the “SmartArt Styles” group. This section provides many different formatting options for lines, fills, colors, and effects. Additionally, you can change the layout of the SmartArt graphic and the size of the shapes by using the “SmartArt Design” and “Resize” tabs.
Therefore, using SmartArt in Microsoft Word is an efficient way to create a flowchart. By following these simple steps, you can quickly create professional-looking diagrams that communicate complex processes and systems. With the different formatting options and designs available in SmartArt, you can customize your flowchart to match your specific needs and preferences.
Using Shapes to Create a Flowchart
Creating a flowchart can help simplify the understanding of complex systems or processes. Microsoft Word provides many features for users to create diagrams, and one of these features is using shapes. This article focuses on how to make a flowchart in Microsoft Word using shapes.
Inserting shapes in Word
First, open a new Word document and go to the “Insert” tab. Here, users have two options for adding shapes. They can select SmartArt, which provides pre-made graphic collections, or use Shapes, which provides basic shapes to be inserted and edited onto the document. To add shapes to a flowchart, click and drag the selected shape or smartart graphic to the appropriate area on the document. Shapes can also be customized by changing the fill color, outline color, and line style.
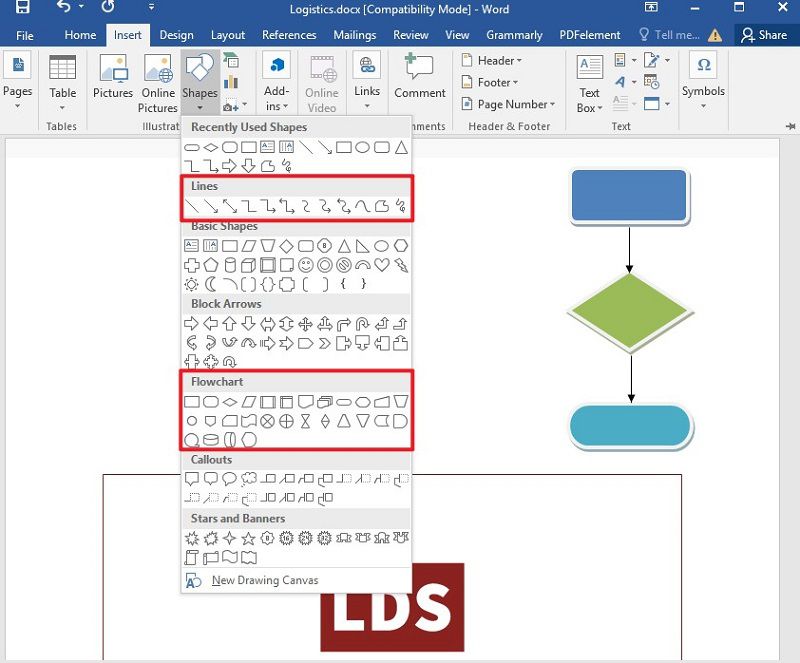
Selecting the flowchart option
To select the flowchart option, go to the Insert tab and select “Shapes.” Select a flowchart shape from the dropdown gallery, then click and drag it to the desired size and place it on the page. Additionally, users can add text to each shape by clicking on it and typing. Different shapes can be used to represent different components of the flowchart, such as a diamond for a decision point or a rectangle for a process.
Adding and customizing shapes
To add additional shapes, repeat the steps from the previous section. To connect shapes, users can use the line tool, found in the “Shapes” menu. Click and drag between two shapes to connect them. Users can also customize the appearance of the shapes by selecting them and using the “Format” tab. Additionally, shapes can be aligned, grouped, ungrouped, or rotated to fit the specific needs of the flowchart.
Therefore, creating a flowchart in Microsoft Word using shapes is a simple and effective way to visually communicate complex processes. The steps are straightforward and customizable to fit the needs and preferences of the user. With the option to add and customize shapes, users can create a detailed and clear flowchart for any project or task.
Adding Text and Descriptions
Once you have inserted a SmartArt graphic in Microsoft Word and customized the shapes, it’s time to add text and descriptions. By adding labels and descriptions to the flowchart, you can provide more context and clarity to the process or system that you are visualizing.
Adding and editing text boxes
To add and edit text boxes for the SmartArt graphic in Word, click on the shape where you want to add text. Then, start typing directly into the shape, or go to the “Text” pane on the left side of the screen. You can also resize the shape to fit more text by selecting the shape and dragging the corners to expand it.
To edit the font or other style elements of the text, you can use the “Font” group in the “Home” tab. This allows you to change the font, size, color, and other attributes of the text in each shape.
Formatting text and shapes
To format the overall appearance of the SmartArt graphic in Word, click on the “SmartArt Tools” tab. Here, you will find a few different options for formatting the shapes and text.
In the “SmartArt Styles” group, you can choose a different color scheme, apply different effects, or add a border. You can also adjust the arrangement and positioning of the shapes in the “SmartArt Layouts” group.
If you want to customize the appearance of a specific shape, click on it and then use the “Shape Styles” group in the “SmartArt Tools” tab. This allows you to change the fill color, outline color, and other visual elements of the shape.
Adding descriptions and explanations
To add more information or descriptions to the SmartArt graphic in Word, you can use the “Notes” pane. This is located directly below the “Text” pane on the left side of the screen.
In the “Notes” pane, you can type in additional information about each process or step. This information can be seen when the cursor is hovered over the shape, providing more context and detail for viewers.
So, adding text and descriptions to a SmartArt graphic in Microsoft Word can enhance the clarity and understanding of a process or system. By customizing the appearance of the shapes and text boxes, you can create a professional-looking flowchart that conveys complex information in a simple and digestible format.
Customizing Your Flowchart
Once the main structure of the flowchart has been created using SmartArt in Microsoft Word, it’s important to customize it to make it more visually appealing and easier to understand. This can be done through a variety of tools and features offered by SmartArt, allowing you to create a polished and professional-looking flowchart in just a few clicks.
Selecting colors and styles
One of the most important elements in customizing a flowchart is selecting the right colors and styles. In SmartArt, you can easily change the color scheme of your flowchart by clicking on the graphic and selecting “Change Colors” in the “SmartArt Styles” group under the “Design” tab. From there, you can choose from a variety of built-in color schemes or create your own custom color scheme.
In addition to color, you can also change the style of your flowchart using the “SmartArt Styles” group. There are a variety of styles to choose from, including different shapes, line styles, and spacing options. You can also add a border or change the alignment of your flowchart to further customize it.
Using gradients and effects
Another way to customize your flowchart is by using gradients and effects. In SmartArt, you can apply different gradients to your shapes or text boxes to create a more three-dimensional effect. You can also add effects such as shadows, reflections, and bevels to make the flowchart stand out and look more polished.
To apply a gradient or effect, select the shape or text box you want to modify and click on the “Shape Styles” group under the “SmartArt Tools” tab. From there, you can choose from a variety of gradient and effect options and adjust the settings as needed.
Adding images and logos
Finally, you can customize your flowchart by adding images and logos. This can be done easily in SmartArt by selecting the appropriate shape or text box and then clicking on “Insert Picture” in the “Illustrations” group under the “Insert” tab.
You can also add logos or other graphics to your flowchart by inserting them as images and then resizing and positioning them accordingly. This can help to enhance the clarity and visual appeal of the flowchart, making it easier for viewers to understand.
Therefore, customizing a flowchart in SmartArt is an easy and effective way to enhance its visual appeal and improve its clarity. By using the available tools and features, you can create a polished and professional-looking flowchart that effectively communicates complex information in a simple and digestible way.
Connecting and Arranging Shapes
After adding text and descriptions to your SmartArt graphic in Microsoft Word, it’s time to connect and arrange the shapes. This step is essential because it helps show the relationships between the different elements in your flowchart effectively. Here are some tips on how to connect and arrange the shapes in your SmartArt graphic:
Adding connectors and lines
To connect shapes in your flowchart, use the “Connector” tool in the “Shapes” menu. This tool allows you to draw a line between two shapes to indicate a relationship. To add a connector, select the “Connector” tool and then click and drag from one shape to the next. A line will appear between the two shapes to show the connection.
To customize the appearance of the connector, select it and use the “Shape Styles” group in the “SmartArt Tools” tab. Here, you can change the color, thickness, and other attributes of the line.
Changing the direction of connectors
By default, connectors in SmartArt graphics flow from the bottom of one shape to the top of another. However, in some cases, you may want the connector to flow in a different direction.
To change the direction of a connector, select it and then drag one of the yellow diamonds at the end of the line. This will adjust the angle and direction of the line, allowing you to create more complex flowcharts with multiple connections and relationships.
Arranging shapes and connectors
To arrange the shapes in your SmartArt graphic, use the “Arrange” group in the “SmartArt Tools” tab. Here, you can align the shapes vertically, horizontally, or in a specific direction. You can also group shapes together or ungroup them to rearrange them as needed.
To adjust the spacing between shapes, use the “Spacing” and “Size” options in the “SmartArt Tools” tab. This allows you to create a more organized and visually appealing flowchart that is easy to read and understand.
Therefore, connecting and arranging shapes in a SmartArt graphic in Microsoft Word is an essential step to creating an effective flowchart. By adding connectors and lines, changing the direction of the connectors, and arranging the shapes and connectors, you can create a visually appealing and organized flowchart that effectively communicates complex information.
Saving and Sharing
After creating a flowchart in Microsoft Word using SmartArt graphics, it’s important to save and share your work. This way, you can collaborate with team members or share your flowchart with others. Here are some tips on how to save and share your flowchart in Microsoft Word.
Saving your flowchart as a Word document or image
To save your flowchart as a Word document, go to the “File” menu and select “Save As.” Choose a name and location for your file, and select “Word Document” as the file format.
If you want to share your flowchart as an image file, go to the “File” menu and select “Export.” Choose a file format such as JPEG or PNG, and select “Save.” This will save your flowchart as an image file that you can share or upload to a website.
Sharing your flowchart with others
To share your flowchart with others, you can send the Word document or image file via email or upload it to a shared folder or platform. Microsoft Word also allows you to share your document directly from within the application.
To do this, go to the “File” menu and select “Share.” From there, you can choose to share your file via email, OneDrive, or a shared network. You can also set permissions and control who can edit or view your file.
Collaborating on a flowchart
If you want to collaborate on a flowchart with other team members, Microsoft Word offers several options for real-time collaboration. You can use the “Share” function to invite others to edit or view your flowchart, or you can use the “Co-authoring” feature to work on the same document at the same time.
To use co-authoring, go to the “Share” menu and select “Share with People.” Choose the people you want to invite, and set their permissions. Once they accept the invitation, you can all work on the same document at the same time, seeing each other’s changes in real-time.
Therefore, saving and sharing your flowchart in Microsoft Word is an essential step to collaborating with team members and sharing your work with others. By saving your flowchart as a Word document or image, sharing it via email or a shared network, and collaborating with others using real-time co-authoring, you can create effective flowcharts that help communicate complex information with ease.
Tips and Tricks
Once you’ve added shapes and connected them in your flowchart, it’s time to refine it further. Here are some tips and tricks to help you create a polished and effective flowchart in Microsoft Word:
Keyboard shortcuts for creating flowcharts
Did you know that there are keyboard shortcuts you can use to add and connect shapes in Microsoft Word? Here are some handy shortcuts to help you work more efficiently:
– To add a shape: Press Alt + N, M, F, and then select a shape from the menu.
– To add a connector: Press Ctrl + Shift + F, and then drag from one shape to another.
– To adjust the positioning of shapes: Press Ctrl + Shift + arrow keys to move a shape in any direction.
These shortcuts can save you time and make it easier to create complex flowcharts quickly.
Using a template to jumpstart your flowchart
If you’re not sure where to start with your flowchart, consider using a template. Microsoft Word offers several flowchart templates to choose from, including basic, cross-functional, and swimlane layouts. These templates include pre-built shapes and connectors, so you don’t have to start from scratch. Simply choose a template that matches your needs and customize it as necessary.
Common mistakes to avoid
When creating a flowchart in Microsoft Word, it’s important to avoid common mistakes that can make your diagram difficult to understand. Here are some mistakes to watch out for:
– Overcrowding: Don’t try to fit too much information into a single shape or connector. This can make the flowchart cluttered and confusing.
– Unclear labeling: Make sure to label each shape and connector clearly and concisely. Use simple language and avoid jargon.
– Incorrect flow direction: Make sure that your connectors flow in the correct direction. If they don’t, it can be difficult to follow the flow of the process.
By avoiding these common mistakes, you can create a flowchart that is easy to read and understand.
Therefore, by using keyboard shortcuts, templates, and avoiding common mistakes, you can create a polished and effective flowchart in Microsoft Word. Whether you’re visualizing a business process, a decision tree, or anything else, a well-designed flowchart can help communicate complex information in a simple and clear way.
Tips and Tricks
When creating a flowchart in Microsoft Word, there are several tips and tricks that can help you refine your diagram and make it more effective. One important thing to keep in mind is keyboard shortcuts. By learning some basic shortcuts, you can save time and work more efficiently. For example, to add a shape, you can press Alt + N, M, F, and then select a shape from the menu. To add a connector, press Ctrl + Shift + F, and then drag from one shape to another. You can adjust the positioning of shapes by using Ctrl + Shift + arrow keys.
Another helpful tool for creating flowcharts in Word is templates. Word offers several flowchart templates to choose from, including basic, cross-functional, and swimlane layouts. These templates come with pre-built shapes and connectors, making it easier to create a polished flowchart quickly. However, it’s important to customize the template as necessary to fit your specific needs.
When creating a flowchart, it’s also important to avoid common mistakes that can make your diagram hard to understand. For example, overcrowding shapes or connectors with too much information can make the diagram cluttered and confusing. Additionally, labeling each shape and connector clearly and concisely in simple language can help people understand the flowchart more easily. Finally, it’s important to make sure that your connectors flow in the correct direction according to the process you’re illustrating.
Final thoughts on creating a flowchart in Word
By using a combination of keyboard shortcuts, templates, and avoiding common mistakes, you can create a polished and effective flowchart in Microsoft Word. Whether you’re visualizing a business process, a decision tree, or anything else, a well-designed flowchart can help communicate complex information in a simple and clear way.
Benefits of using flowcharts in your work
Flowcharts can be a powerful tool in business and other settings. Here are some benefits of using flowcharts:
– Visual representation of information: Flowcharts can help people understand complex processes or ideas by presenting them in a visual way.
– Clear communication: By breaking down a complex process into simpler steps, a flowchart can help ensure that everyone understands the process the same way.
– Improved decision-making: Flowcharts can help identify inefficiencies or areas for improvement in a process, allowing for better decision-making.
– Agile methodology: Flowcharts are often used in Agile project management to visualize workflows and identify potential roadblocks or bottlenecks.
Frequently Asked Questions
– How do I insert a flowchart in Word?
To insert a flowchart in Word, click on Illustrations, go to SmartArt, select Process, and then choose a flowchart template.
– Can I customize a flowchart template in Word?
Yes, you can customize a flowchart template in Word by adding or deleting shapes, editing text, and adjusting the formatting.
– What are some common mistakes to avoid when creating a flowchart in Word?
Common mistakes to avoid include overcrowding shapes or connectors with too much information, not labeling shapes or connectors clearly, and having connectors flow in the wrong direction.
– Can I use a flowchart for project management?
Yes, a flowchart can be a handy tool for project management, especially in Agile methodology. It can help visualize workflows, identify bottlenecks, and improve decision-making.
So, creating a flowchart in Microsoft Word can be an effective way to communicate complex information in a clear and visual way. By using some simple tips and tricks, you can refine your flowchart and avoid common mistakes. Additionally, flowcharts can have many benefits in business and other settings, making them a useful tool for anyone looking to visualize or optimize a process.


