how to wipe cache partition on android phone or tablet
Clearing the cache partition on an Android device is an essential task that keeps the phone running smoothly without any interruptions. It is one of the most straightforward maintenance tasks that Android users can perform on their devices. In this article, we will discuss what cache partition is, why clearing it is essential, and how it helps in improving the performance of the Android device.
What is Cache Partition and why do you need to clear it?
The cache partition is a dedicated space on the Android device that stores temporary files and app data. These files are used to load the app faster and provide a seamless user experience. However, sometimes, these temporary files accumulate, leading to performance issues and bugs. Clearing the cache partition deletes all these files, freeing up space and ensuring that the device works smoothly.
Android devices get system updates frequently, and these updates require cache partition space. If the cache partition is full of old data, it can lead to errors during the system update process. Hence clearing the cache partition is beneficial for Android users, keeping their devices functioning efficiently and enabling them to get the most out of new updates.
How clearing cache partition help to improve the performance of your Android device?
Clearing the cache partition on your Android device can help improve the device’s performance in several ways. Here are some benefits of clearing cache partition:
– Faster app loading: Whenever an app loads, it pulls data from the cache partition. Clearing the cache partition helps to reduce the size of the data, enabling the apps to load faster.
– Improved system performance: As the cache partition data takes up storage space on your Android device, clearing it frees up space. This extra space results in better system performance, quicker file transfers, and improved overall device usability.
– Better battery life: When there is excess cache partition data, it takes additional processing power to load the apps. This extra processing power can cause excessive battery drain, and in some cases, reduced battery life. Clearing the cache partition can prevent this issue and improve battery life.
Therefore, regularly clearing the cache partition on your Android device is an essential maintenance task that ensures the smooth performance of your device. It is a simple task, but it can improve the overall user experience by boosting the device’s speed, battery life, and reducing the risk of potential bugs.
How to Wipe Cache Partition on Android Phone or Tablet?
Wiping the cache partition on an Android device is a simple and easy way to clear the temporary files that might be causing issues with the device’s performance. This process can help to resolve any issues with the device, such as sluggishness, freezing, or crashing. Here’s a step-by-step guide on how to wipe cache partition on an Android phone or tablet.
Step by step guide to wipe cache partition on Android phone or tablet
To wipe the cache partition, follow the steps below:
1. Turn off your Android device.
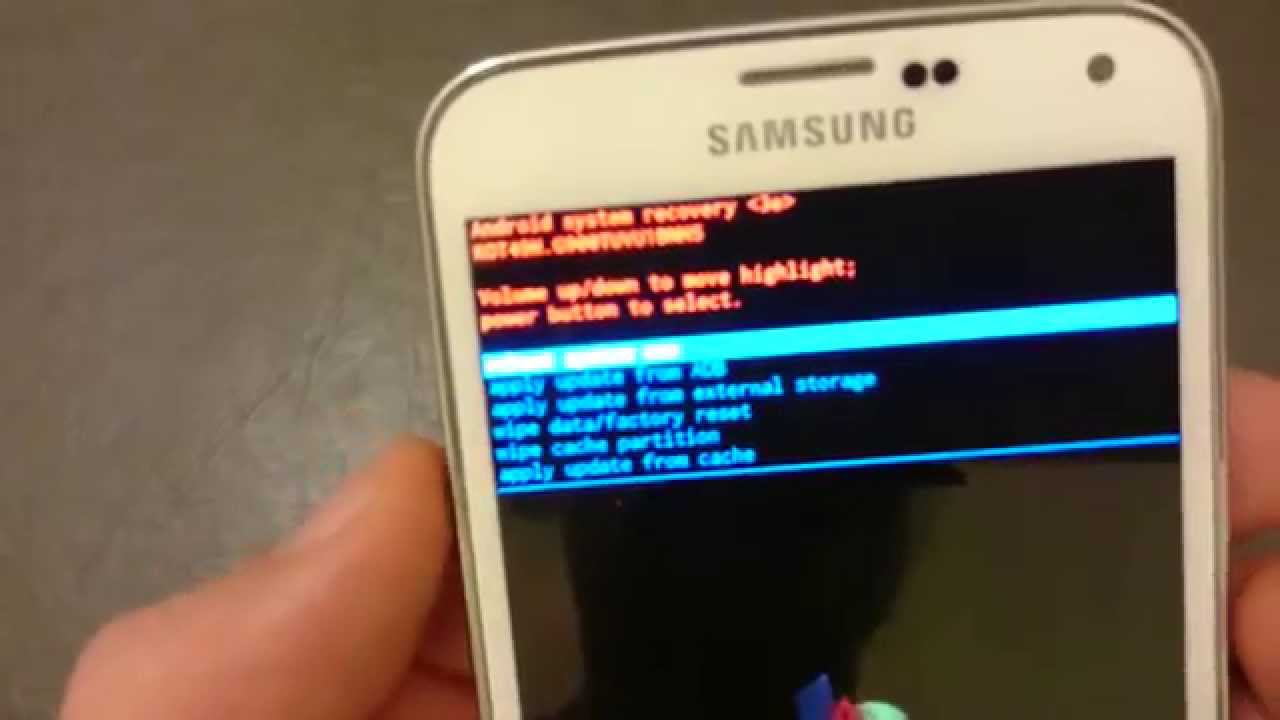
2. Press and hold the Volume Down and Power buttons simultaneously until the device boots into Recovery Mode.
3. Use the Volume buttons to navigate the Recovery Mode menu and select “Wipe Cache Partition.”
4. Press the Power button to select the option.
5. Confirm the action by selecting “Yes” and pressing the Power button again.
6. Wait for the cache partition to be cleared, and then select “Reboot System Now”.
Your device will now reboot and clear the cache partition. This process will not erase any data stored on the device, and it is entirely safe to perform.
Alternative methods to wipe cache partition
There are other methods to wipe the cache partition on an Android device:
1. Using the Settings Menu
Some Android devices allow you to clear the cache partition through the Settings menu. To access this, go to Settings > Storage > Cached Data > Clear Cached Data.
2. Using a third-party app
There are many third-party apps available in the Google Play Store that can help to clear the cache partition on an Android device. These apps are easy to use and can perform the task with just one tap.
Therefore, wiping the cache partition on an Android device is a simple process that can help to resolve any performance issues with the device. It is entirely safe to perform and should be considered whenever the device is experiencing issues.
Precautions before Clearing Cache Partition
Clearing the cache partition on an Android device is an effective way to resolve any performance issues. However, there are some important precautions that must be kept in mind before proceeding with the process. Here are some key things to keep in mind:
7 things to keep in mind before clearing cache partition
1. Make sure your device is fully charged before proceeding with the process to avoid any unwanted shutdowns during the process.
2. Backup your important data before proceeding as there is always a possibility of data loss during the cache wiping process.
3. Clearing the cache partition should be considered as a fix to a problem. If you are unsure about what the issue is, clear cache partition as a troubleshooting shouldn’t be performed.
4. It is important to note that wiping the cache partition will not delete any personal data. You will not lose any emails, photos, messages, contacts, or other personal data on your Android device.
5. The process of clearing cache partition varies from one device to another, so make sure to follow a specific set of instructions that are relevant to your device.
6. Depending on the device, this process may take several minutes to complete. Do not interrupt the process or power off the device while the cache partition is being cleared.
7. Clearing the cache partition is a maintenance task for your device. It should be performed periodically, but not excessively. Overdoing it can cause problems with your apps and data.
Backup your important data before proceeding
Before proceeding with the process of clearing your device’s cache partition, it is recommended to backup all your important data. Although clearing the cache partition should not result in data loss, it is better to be prepared in case something unexpected occurs.
Therefore, it is important to understand the process of clearing the cache partition on your Android device and to take the necessary precautions before proceeding with the process. Following the steps carefully and backing up your data before the process is highly recommended to avoid any loss of important data. With these precautions in mind, clearing the cache partition can help your device run smoothly and resolve any performance issues it might be experiencing.
Clear Cache Partition on Samsung Galaxy Devices
Clearing the cache partition on Samsung Galaxy devices is a simple and effective solution to fix performance issues. The process clears the temporary files on the device that may be causing the device to slow down or stop working correctly. This blog post will guide you on how to clear the cache partition on Samsung Galaxy devices and show you how to boot into Recovery mode.
Step by step guide to clear cache partition on Samsung Galaxy Devices
To clear the cache partition on Samsung Galaxy devices, follow the steps below:
1. Turn off your Samsung device
2. Press and hold the Volume Up, Bixby, and Power buttons simultaneously
3. Release all buttons when the Samsung logo appears, and the Android Recovery menu will appear
4. Use the Volume Down button to navigate to “Wipe Cache Partition.”
5. Press the Power button to select the option
6. Use the Volume Down button to highlight “Yes” and then press the Power button to confirm
7. Wait for the process to complete
8. Use the Volume Down button to highlight “Reboot System Now” and then press the Power button to confirm
9. Your device will reboot, and the cache partition will be cleared
How to boot into Recovery mode on Samsung Galaxy Devices
To boot into Recovery mode on Samsung Galaxy devices, you need to follow the steps below:
1. Turn off your Samsung device
2. Press and hold the Volume Up, Bixby and Power buttons simultaneously
3. Release all buttons when the Samsung logo appears, and the Android Recovery menu will appear
It’s important to note that clearing the cache partition will not delete any personal data on your device. However, you may lose your saved login credentials and Wi-Fi passwords.
If your Samsung device is still experiencing performance issues after clearing the cache partition, you may need to consider other troubleshooting options, such as a factory reset or seeking technical support.
Therefore, clearing the cache partition on Samsung Galaxy devices can be a helpful solution to fix performance issues. If you are experiencing any issues with your device, follow the steps above to clear the cache partition and enjoy a faster, more efficient device.
Clear Cache Partition on Google Pixel Devices
Clearing the cache partition on Google Pixel devices can help fix performance issues, such as slow loading speeds or app crashes. This blog post provides step-by-step instructions on how to clear the cache partition on Google Pixel devices and how to boot into Recovery mode.
Step by step guide to clear cache partition on Google Pixel Devices
To clear the cache partition on a Google Pixel device, follow these steps:
1. Go to Settings and select Apps.
2. Tap on See all apps and select the app you want to clear the cache for.
3. Tap on Storage & cache and then select Clear cache.
4. Repeat for all apps on your device.
Note: As there is no way to clear cache for all apps at once, you will need to clear each one individually.
If the problem persists after clearing the cache partition, you may need to consider other troubleshooting options, such as a factory reset or seeking technical support.
How to boot into Recovery mode on Google Pixel Devices
To boot into Recovery mode on a Google Pixel device, follow these steps:
1. Turn off your device.
2. Press and hold the Volume Down button and the Power button simultaneously until the Google logo appears.
3. Use the Volume Down button to navigate to the Recovery mode option and press the Power button to select it.
4. Once in Recovery mode, use the Volume buttons to navigate to Wipe cache partition and press the Power button to select it.
5. Wait for the process to complete and then select Reboot system now.
Note: Google has removed the wipe cache partition option for devices that receive seamless updates.
It is important to note that clearing the cache partition will not delete any personal data on your device. However, you may lose your saved login credentials and Wi-Fi passwords.
Therefore, clearing the cache partition on Google Pixel devices can be an effective solution to fix performance issues. Follow the above steps to clear the cache partition on your device and enjoy a faster, more efficient device. If the problem persists, consider other troubleshooting options or seek technical support.
Clear Cache Partition on OnePlus Devices
Clearing the cache partition on OnePlus devices is an effective way to boost the performance of the device. It helps in removing temporary files that might be causing the device to slow down or work inefficiently. In this blog post, we will guide you on how to clear the cache partition on OnePlus devices and how to boot into Recovery mode.
Step by step guide to clear cache partition on OnePlus Devices
To clear the cache partition on OnePlus devices, follow the steps below:
1. Turn off your OnePlus device
2. Press and hold the Power button and Volume Down button simultaneously
3. Release all buttons when the OnePlus logo appears, and the device enters Recovery mode
4. Use the Volume Down button to navigate to “English” and press the Power button to select
5. Use the Volume Down button to navigate to “Wipe data and cache”
6. Select “Wipe cache” and press the Power button to select
7. Wait for the process to complete
8. Use the Volume Down button to navigate to “Reboot system” and press the Power button to select
9. Your device will reboot, and the cache partition will be cleared
How to boot into Recovery mode on OnePlus Devices
To boot into Recovery mode on OnePlus devices, you need to follow the steps below:
1. Turn off your OnePlus device
2. Press and hold the Power button and Volume Down button simultaneously
3. Release all buttons when the OnePlus logo appears, and the device enters Recovery mode
It is important to mention that clearing the cache partition will not delete any personal data on your device, but it will help in improving its performance.
If your OnePlus device is still experiencing performance issues after clearing the cache partition, you may need to consider other troubleshooting options, such as a factory reset or seeking technical support. By following the above steps, you can clear the cache partition on your OnePlus device and enjoy a faster and more efficient device.
Clear Cache Partition on Huawei and Honor Devices
Clearing cache partition on Huawei and Honor devices is important to maintain their performance. Accumulated temporary files slow down the device and cause it to work inefficiently. In this blog post, we will give you a step-by-step guide on how to clear the cache partition on Huawei and Honor devices and how to boot into Recovery mode to access the cache.
Step by step guide to clear cache partition on Huawei and Honor Devices
To clear the cache partition on your Huawei or Honor devices, follow the steps below:
1. Turn off your Huawei or Honor device
2. Press and hold the Volume Up button and Power button simultaneously
3. Release the Power button when the device vibrates, but continue to hold the Volume Up button
4. The device will then boot into Recovery mode. Use the Volume Down button to scroll through the menu and select “Wipe cache partition”
5. Use the Power button to confirm your selection
6. Wait for the process to complete
7. Once completed, select “Reboot system now” from the Recovery menu
8. After the device reboots, the cache partition will be cleared
How to boot into Recovery mode on Huawei and Honor Devices
Here are the steps that you need to follow to boot into Recovery mode on Huawei and Honor devices:
1. Turn off your Huawei or Honor device
2. Press and hold the Volume Up button and Power button simultaneously
3. Release the Power button when the device vibrates, but continue to hold the Volume Up button
4. The device will then boot into Recovery mode
It is important to note that clearing the cache partition will not delete any personal data on your device. Only temporary files will be deleted. However, it is recommended that you back up your data before proceeding with clearing the cache partition.
If your Huawei or Honor device still experiences performance issues after clearing the cache partition, you might have to consider other troubleshooting options, like a factory reset or seeking technical support.
By following these simple steps, you can clear the cache partition on your Huawei or Honor device and enjoy a faster and more efficient device. Cache clearing should be done regularly to maintain the optimal performance of your device.
Clear Cache Partition on Motorola Devices
Motorola devices can also benefit from clearing the cache partition, which can improve the device’s performance by removing temporary files that may be causing it to slow down or work inefficiently. In this section, we will provide a step-by-step guide on how to clear the cache partition on Motorola devices and how to boot into Recovery mode.
Step by step guide to clear cache partition on Motorola Devices
To clear the cache partition on Motorola devices, follow the steps below:
1. Turn off your Motorola device
2. Press and hold the Power button and Volume Down button simultaneously
3. Release all buttons when the Boot Mode Selection Menu appears
4. Use the Volume Down button to navigate to “Recovery” and press the Volume Up button to select
5. When the “No Command” screen appears, hold the Power button and press the Volume Up button
6. Use the Volume Down button to navigate to “Wipe cache partition” and press the Power button to select
7. Wait for the process to complete
8. Use the Volume Down button to navigate to “Reboot system now” and press the Power button to select
9. Your device will reboot, and the cache partition will be cleared
How to boot into Recovery mode on Motorola Devices
To boot into Recovery mode on Motorola devices, you need to follow the steps below:
1. Turn off your Motorola device
2. Press and hold the Power button and Volume Down button simultaneously
3. Release all buttons when the Boot Mode Selection Menu appears
4. Use the Volume Down button to navigate to “Recovery” and press the Volume Up button to select
It is essential to mention that clearing the cache partition on Motorola devices will not delete any personal data on your device, but it will help in improving its performance.
If your Motorola device is still experiencing performance issues after clearing the cache partition, you may need to consider other troubleshooting options, such as a factory reset or seeking technical support. By following the above steps, you can clear the cache partition on your Motorola device and enjoy a faster and more efficient device.
Tips and Tricks to Maintain Your Android Device
If your Android device has been slowing down or exhibiting odd behavior, it may be time to give it some maintenance. Follow these tips and tricks to ensure that your device remains running smoothly:
How to keep your Android device running smoothly
1. Clear your cache regularly: Clearing your cache partition can help free up space on your device and improve its performance. Follow the steps outlined in previous sections to clear your cache partition.
2. Uninstall unused apps: Unused apps can take up valuable space on your device and slow down its performance. Ensure that you uninstall any apps that you no longer use.
3. Turn off auto-sync: While auto-sync can be a useful feature, it can also drain your device’s battery life. Turn off auto-sync in Settings to prolong your battery life.
4. Disable unnecessary animations: Animations can look nice, but they can also slow down your device’s performance. Disable animations in developer options to free up resources.
Other methods to improve the performance of your Android device
1. Check for software updates: Updating your device’s software can help fix any bugs that may be causing performance issues. Check for updates regularly in Settings.
2. Factory reset: When all else fails, a factory reset can be a useful tool in restoring your device’s performance. Remember to back up any important data before performing a factory reset.
3. Seek technical support: If your device is still experiencing issues after following these steps, it may be time to seek technical support. Your device’s manufacturer or carrier may have additional resources to help troubleshoot and resolve any issues.
By following these tips and tricks for maintaining your Android device, you can ensure that it remains running smoothly and efficiently. Clear your cache regularly, uninstall unused apps, turn off auto-sync, and disable unnecessary animations. Other methods to improve your device’s performance include checking for software updates, performing a factory reset, and seeking technical support. Maintenance is necessary for all devices, and your Android device is no exception.
Clear Cache Partition on Motorola Devices
Motorola devices, like any other Android device, may slow down or work inefficiently due to temporary files accumulated on the system. Clearing the cache partition can help improve the performance of the device. This guide provides step-by-step instructions on how to clear the cache partition on Motorola devices and how to boot into Recovery mode.
Step-by-Step Guide to Clear Cache Partition on Motorola Devices
To clear the cache partition on Motorola devices, follow these steps:
1. Turn off your Motorola device.
2. Press and hold the Power button and Volume Down button simultaneously.
3. Release all buttons when the Boot Mode Selection Menu appears.
4. Use the Volume Down button to navigate to “Recovery” and press the Volume Up button to select.
5. When the “No Command” screen appears, hold the Power button and press the Volume Up button.
6. Use the Volume Down button to navigate to “Wipe cache partition” and press the Power button to select.
7. Wait for the process to complete.
8. Use the Volume Down button to navigate to “Reboot system now” and press the Power button to select.
9. Your device will reboot, and the cache partition will be cleared.
How to Boot into Recovery Mode on Motorola Devices
To boot into Recovery mode on Motorola devices, follow these steps:
1. Turn off your Motorola device.
2. Press and hold the Power button and Volume Down button simultaneously.
3. Release all buttons when the Boot Mode Selection Menu appears.
4. Use the Volume Down button to navigate to “Recovery” and press the Volume Up button to select.
Clearing the cache partition on Motorola devices does not delete any personal data on the device, but it helps in improving its performance. If the device still experiences performance issues after clearing the cache partition, other troubleshooting options, like a factory reset or technical support, may be necessary.
Final Thoughts on Clearing Cache Partition
Clearing the cache partition is a simple and essential process that Android users should perform regularly, regardless of the device model. It helps in clearing temporary files that might be causing the device to slow down or work inefficiently, making it function better. By following this guide, Motorola device users can clear the cache partition and enjoy a faster and smoother experience.
The Importance of Regularly Clearing Cache Partition on Your Android Device
Regularly clearing cache partition on Android devices can significantly improve its performance and speed by removing temporary files that may be causing the device to function inefficiently. It ensures that the system updates do not use outdated files or data, making them more effective. Therefore, it is recommended that Android users perform cache partition clears frequently, even on devices that appear to be functioning optimally, to improve performance, speed, and overall device health.


