how to create a template on powerpoint
PowerPoint is a popular tool used for giving presentations in various fields such as business, education, and more. Creating a PowerPoint template is an important step in crafting a visually appealing presentation that delivers the message effectively. In this article, the process of creating and saving a PowerPoint template will be outlined using various versions of PowerPoint ranging from PowerPoint for Microsoft 365 to older versions such as PowerPoint 2007.
The importance of PowerPoint templates
PowerPoint templates play a vital role in creating a professional and cohesive look for a presentation. A well-designed template can enhance the visual appeal of a presentation and help to better convey the message to the audience. Templates can be customized to incorporate a company’s branding or to suit a particular topic. Having a consistent template also helps to keep the presentation organized and easy to follow, thereby making it more effective.
The benefits of creating your own template
Creating a custom template allows one to personalize the presentation and make it unique while maintaining a professional and consistent look. Custom-made templates can be reused for future presentations, saving time in the long run. It is also possible to share the template with others, thereby promoting consistency in presentations across the organization. Additionally, by creating your template, one has full control over the design elements such as the color scheme, font choice, and layout.
To create a custom template in PowerPoint, one can open a blank presentation and choose the desired page dimensions in the Page Setup section. From there, select the Slide Master view from the View tab in the Master Views group. The slide master represents the larger slide image, and the associated layouts are positioned smaller beneath it. Here, one can add design elements, such as a background image, and include placeholders for text and images.
Therefore, PowerPoint templates are a crucial aspect of creating a visually appealing and effective presentation. Creating a custom template can personalize the presentation while maintaining consistency in design and enhancing the message. By using the steps outlined earlier in this article, one can create a custom template tailored to their needs and needs of their organization.
Choosing the Right Design
Selecting the appropriate slide size and orientation
To create a PowerPoint template, the first step is to open a blank presentation and select Slide Size on the Design tab. From there, you can choose Custom Slide Size and select the page orientation and dimensions that you want. This is an important step because it determines how your presentation will look and how much content you can fit on each slide. You can choose from a variety of standard sizes or customize your own to fit your needs.
Once you have selected your slide size and orientation, you can move on to creating and saving a custom theme.
Selecting a suitable color theme and font
After selecting your slide size and orientation, the next step is to select a suitable color theme and font for your presentation. This can be done by selecting your first slide and then clicking on the Design tab. From there, you can choose from a variety of built-in options or customize your own colors, fonts, effects, and background styles.
When choosing a color theme, it is important to consider the overall tone and message of your presentation. If you’re presenting data or statistics, you may want to choose a more neutral color scheme that won’t distract from the information. If you’re presenting a creative project or idea, you may want to choose a more vibrant and eye-catching color scheme.
Similarly, when choosing a font, it is important to consider how it will impact the readability and accessibility of your presentation. You may want to choose a larger font size for slides with a lot of text, or choose a more simple font that is easy to read.
Overall, selecting the appropriate slide size and orientation, as well as a suitable color theme and font, are essential steps in creating a visually engaging and effective PowerPoint template.
Starting with a Blank Template
How to start a blank presentation
When beginning to create a PowerPoint template, the first thing to do is to open a blank presentation. This can be done by navigating to File > New > Blank Presentation. From there, you can select the slide size and orientation that you want to use by clicking on the Design tab and selecting Slide Size > Custom Slide Size. This will allow you to choose the dimensions and page orientation that best suit your needs.
Once you have selected your slide size and orientation, you can begin customizing your presentation by selecting a color scheme, font, and other design elements. This can be done by navigating to the Design tab and selecting the options that best match your desired look and feel.
The benefits of starting with a blank template
There are several benefits to starting with a blank PowerPoint template rather than using a pre-made one. First and foremost, starting with a blank template allows you to fully customize the look and feel of your presentation to match your specific needs and branding. This means that you can choose the colors, fonts, and design elements that best represent your organization or project.
In addition, starting with a blank template allows you to create a consistent look and feel across all of your slides, which can help to improve the overall flow and coherence of your presentation. This is because you can create a set of design elements, such as a color scheme or font, that can be used throughout your presentation to tie everything together.
Overall, starting with a blank PowerPoint template can give you the flexibility and creative freedom to fully customize your presentation and present your ideas in the most effective way possible.
Accessing Slide Master View
What is Slide Master View and its importance?
The Slide Master is the top slide in a hierarchy of slides that stores information regarding the theme and slide layouts of a presentation, including the background color, fonts, effects, placeholder sizes, and positioning. Slide Master helps you save time and organize your presentation’s design.
When you create a Slide Master, you can make changes to the design globally, including the fonts, colors, and background. It’s beneficial to use Slide Master when creating a presentation with a consistent design and uniform structure.
How to access Slide Master View
Accessing Slide Master View in PowerPoint is easy. Follow these simple steps:
1. Open the PowerPoint Presentation you want to edit.
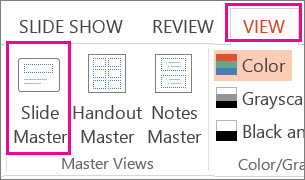
2. Click on the “View” Tab located in the PowerPoint Ribbon.
3. From the “View” tab, click on “Slide Master” located in the “Master Views” section.
4. You will enter the Slide Master View.
Once in Slide Master View, the Slide Master appears at the top of the thumbnail pane with related layouts beneath it. To modify the Slide Master, click on the Master Slide and then click on the “Master Layout” located on the Slide Master tab.
Once you are finished making the necessary edits, click on the “Close Master View” button located in the Close section in the Slide Master tab.
Therefore, understanding the Slide Master View and how to access it is essential to create a visually pleasing PowerPoint presentation. By using the Slide Master, you can make changes to the design globally, ensuring that your presentation is consistent and well-structured. Accessing the Slide Master View is simple and can help save your time while helping you to leverage the power of PowerPoint.
Inserting Slide Masters
How to insert a new slide master
One of the important features of PowerPoint is the ability to customize the design of a presentation using the Slide Master. To add an additional slide master to your presentation, follow these steps:
1. Click on the “View” tab located on the PowerPoint ribbon.
2. Click on “Slide Master” located in the “Master Views” section.
3. Once in Slide Master view, select the “Insert Slide Master” option located in the “Edit Master” group.
4. You can select either a theme or a blank layout for the new slide master. If you choose a theme, the new slide master will adhere to that theme’s preset design and color scheme.
5. Customize the slide master by editing the theme, layouts, colors, fonts, effects, and placeholders as per your requirement.
This way, you can create different slide masters for different sections of the presentation, each with their own unique design and layout.
The benefits of multiple slide masters
Creating multiple slide masters can prove to be useful in many ways. Here are a few benefits of using multiple slide masters in your PowerPoint presentations:
1. Enhanced customization – Using multiple slide masters makes it easier to customize your presentation to better reflect your brand, message, or theme. You can add different layouts, background colors, fonts, and effects to create a unique look and feel for different sections of your presentation.
2. Consistency – Multiple slide masters promote consistency in design throughout your presentation. If you want a section to have a distinctly different design from the rest of the presentation, simply create a new slide master for that section. This way, each slide in that section follows the same design pattern.
3. Increased productivity – Using slide masters reduces the time taken to create a slideshow. You only need to make the changes in a master slide, which is then applied to every corresponding layout without any hiccups. This is particularly helpful if you want to update multiple aspects of your presentation at once.
Therefore, multiple slide masters provide a lot of customization flexibility while ensuring consistent design throughout the presentation. Incorporating slide masters into your PowerPoint presentations is a great way to enhance the visual appeal of your slides while saving time and effort.
Customizing Slide Masters
Once you have gained access to Slide Master View in PowerPoint, you can easily customize your presentation’s design using a variety of tools and features. In this blog section, we will take a closer look at some of the different ways to customize and enhance your presentation using Slide Master View.
Editing the slide layout and background
One of the main benefits of Slide Master View is that you can make changes to your presentation’s slide layout and background quickly and easily. Here are some steps to follow:
1. Navigate to the “Slide Master” tab located in the PowerPoint Ribbon, once you are in Slide Master View.
2. Select the “Master Slide” in the thumbnail pane and click on the “Master Layout” you wish to edit.
3. You can now add, remove or rearrange any objects on the slide. This includes text boxes, graphics, shapes.
4. To modify the background color or any design elements, select the “Background Styles” option from the ribbon.
With these simple steps, you can create a custom slide layout and alter the appearance of the slides. Keep in mind that the changes made in the Slide Master View are applied to all slides that use the same layout.
Adding placeholders to the slide master
Placeholders are predefined areas on a slide that hold specific types of content, such as text, graphics, or multimedia elements. PowerPoint provides a variety of built-in placeholders for different slide types, such as Title slide, Content slide, Picture slide, etc.
Here are the steps to add a placeholder in Slide Master View:
1. Select the “Master Slide” in Slide Master View.
2. Click on the “Insert Placeholder” button located in the “Master Layout” group on the Slide Master tab.
3. Choose the type of placeholder you want to insert, such as a text box or a picture box.
4. Position the placeholder where you want it on the slide layout.
Once you have added the placeholder to the slide master, it will be automatically added to all related layout slide created using that master slide. You can easily customize placeholders by changing their size, font, and color, meaning you have complete control over the presentation’s design.
Therefore, using Slide Master View in PowerPoint is essential to save time and create a visually appealing presentation with a uniform structure. Customizing your presentation’s design using tools such as editing slide layouts and adding placeholders allows you to create a customized presentation that meets your unique needs. With these simple tips, you can leverage the power of PowerPoint to create engaging, visually stunning presentations.
Adding Theme Colors and Fonts
Customizing the design of a PowerPoint presentation is essential to create a visually appealing and engaging presentation. One of the ways to make your presentation stand out is by choosing the right theme colors and fonts that complement your message and content.
Choosing theme colors and fonts
The first step to customizing your presentation’s theme is by selecting the right colors and fonts that match your message and brand personality. PowerPoint provides built-in theme colors and fonts that you can choose from or customize according to your preference.
To select a theme color or font:
1. Go to the Design tab in the PowerPoint Ribbon.
2. Click on the drop-down menu in the Variants group.
3. Choose Colors or Fonts to see the options available to you.
4. Select the theme color or font that matches your content and message.
With just a few clicks, you can completely change the look and feel of your presentation.
Creating custom theme colors and fonts
For a more personalized touch, you can create custom theme colors and fonts that match your branding or style. This is especially useful if you want to create a unique look for your presentation that differentiates it from others.
Here are the steps to create custom theme colors and fonts:
1. Go to the Design tab in the PowerPoint Ribbon.
2. Click on the drop-down menu in the Variants group.
3. Choose Colors or Fonts.
4. Click on “Customize Colors” or “Customize Fonts” at the bottom of the menu.
5. Choose the colors or fonts you want to modify, and adjust them according to your preference.
6. Once you are satisfied with your custom theme, click on “Save as Theme” to save your changes.
Creating custom theme colors and fonts gives you complete control over the presentation’s design, ensuring that it stands out and captures your audience’s attention.
Therefore, customizing your PowerPoint presentation’s theme colors and fonts is essential to creating a visually appealing and engaging presentation. By choosing the right colors and fonts or creating custom ones, you can make your presentation unique and memorable. With the help of PowerPoint’s built-in tools and features, you can easily create a customized and professional-looking presentation that accurately reflects your brand and message.
Using PowerPoint Designer
What is PowerPoint Designer and how it works?
PowerPoint Designer is an intelligent feature available in Microsoft PowerPoint. It uses intelligent services and machine learning algorithms to analyze the content on slides and provide design ideas. Designer is specifically designed to help users create professional-looking presentations without having any prior design knowledge or skills.
The way PowerPoint Designer works is simple. When users add images to their slides, Designer uses Azure to analyze those images and recognizes the most predominant colors. It then suggests design ideas based on those colors, including layouts, graphics, and fonts, to make the slide look more visually appealing and professional. Designer also allows the users to select the suggested design or go back to the original slide design by pressing the undo command.
How to use PowerPoint Designer
To access PowerPoint Designer, users need to select the “Design Ideas” button on the PowerPoint Ribbon, which is available under the “Design” tab. Once the Designer pane opens, users can scroll through suggestions provided by Designer and select the one that best fits their presentation or go with their original design.
In addition to using Designer with images, users can also use it with text. When users insert text, Designer automatically generates suggested layouts and formats based on the content’s theme and context. These formats can be easily applied by selecting the “Design Ideas” button.
It’s important to note that Designer is only available in PowerPoint for Microsoft 365 and PowerPoint in Microsoft 365 for Mac. It is a subscriber-only feature.
Therefore, PowerPoint Designer is an incredible tool that can save users time and effort and help them create professional-looking presentations without any design experience. By following the simple steps outlined above, users can easily access Designer and take their presentations to the next level.
Conclusion
Therefore, PowerPoint Designer is an amazing feature that can help users enhance their presentations effortlessly and create beautiful and professional-looking slides with ease. Its intelligent services and machine learning algorithms analyze the content and suggest design ideas that best fit the presentation theme. By selecting these suggestions, users can save time and effort while still creating visually appealing presentations.
Benefits of creating a PowerPoint template
Creating a PowerPoint template for your company or organization has many benefits. Some of these benefits include:
– Consistent branding: By creating templates that are correctly branded, you can ensure that all presentations have consistent visual elements, including the use of logos, fonts, and colors.
– Improved communication: With a range of different presentation types/templates, employees can communicate their message easily and effectively without limiting creativity.
– Time-saving: PowerPoint templates remove the need to spend hours designing presentations from scratch, resulting in time saved in the long run.
Tips for creating an effective template
To create an effective PowerPoint template, some helpful tips include:
– Variety: Create templates for a range of different presentation types, allowing for flexibility in style and design.
– Correct branding: Ensure templates are branded correctly and have consistent visual elements such as logos, fonts, and colors.
– Ease of use: Keep the template user-friendly, with clear and easy-to-follow instructions on its use.
– Customization: Leave room for customization within the template, allowing employees to add their own content and visuals while still maintaining brand consistency.
By utilizing these tips, you can create effective and professional PowerPoint templates that can be used by all employees to create consistent, on-brand presentations with ease.


