Introduction
Taking passport photos can often be a tedious task, especially when it comes to ensuring that the photo meets the specific standards required by various countries. However, IDPhoto4You offers an easy-to-use tool for creating passport, visa, and ID photos that are not only free of charge but also meet the standards of 73 countries.
Explanation of the Importance of Passport Photos and the Use of IDPhoto4You
Passport photos are a vital part of any passport application process. The photos must meet specific requirements of each country for identification purposes and to prevent fraud. It is crucial to have a clear and high-quality photo to ensure the process of obtaining a passport runs smoothly.
IDPhoto4You offers an excellent solution to the challenges that come with creating a passport photo. With the tool, users can create their passport photos by themselves using a digital camera or smartphone. The tool provides multiple print sizes, and the photo can be edited to adjust contrast and brightness to meet specific requirements, including manual cropping.
In total, IDPhoto4You has generated more than 11 million passport photos with the user-friendly tool it provides. Using the tool, the user can quickly prepare photos that meet specific sizes required for social media accounts, online applications, and even photos for CVs. The platform can also be used to create passport size photos of children, including infants.
Therefore, IDPhoto4You offers a free, easy-to-use tool that makes creating passport, visa, and ID photos an almost effortless task. With the tool’s ability to generate high-quality photos and its flexibility to adjust to various standards, the tool can be used by anyone who needs passport photos or photos for any identification purposes.
Getting Started
Overview of the IDPhoto4You website and how to use it.
IDPhoto4You is a free online tool that enables users to create their own passport, visa, and ID photos. Over the last eleven years, the website has created more than 11 million passport photos for more than 11 million users. The website offers an easy-to-use tool, making it possible for users to create their own passport photos without having to pay for a professional photographer or a photo booth.
To get started, users need to upload a photo. After uploading the photo, the user is presented with a number of options to create a passport photo that both suits the user and meets the standards. Users can select the country, photo type, and print size, and then edit and crop the image to create the perfect passport photo.
Selecting the country, phototype, and print size.
The first step in using IDPhoto4You is to select the country, photo type, and print size. Users can select the country for which they need the passport photo, and the website will automatically adjust the size and format of the photo to meet the requirements of that country. Users can also choose the photo type, such as passport, visa, or ID photo, and the print size, which could be standard or custom size.
Once the user has selected the country, photo type, and print size, they can upload the photo they want to use for the passport photo. After uploading the photo, the website automatically opens the Crop page, where the user can cut the image using the crop frame. After setting the cropping, the Make Photo button can be clicked to create the passport photo.
To download the final passport photo, the user can click on the Download page and either print the image on a photo printer or forward it to a digital photo lab for printing.
Overall, IDPhoto4You is a user-friendly tool that enables users to create their passport photos quickly and easily. With multiple print sizes available and the ability to create different types of photos, the website is a great option for anyone in need of a passport or visa photo.
Uploading Your Photo
How to upload your photo to the IDPhoto4You website for editing.
After selecting the country, photo type, and print size, the user is prompted to upload a photo that meets the website’s requirements. The website allows for photos from digital cameras, smartphones, and webcams, as long as they are in JPEG format and meet the minimum resolution of 600 x 600 pixels.
To upload the photo, the user can click on the “Choose file” button and select the desired photo from their device. Alternatively, the website also offers the option to take a photo using the device’s webcam or directly from Facebook.
Detailed instructions on how to upload the photo for editing.
Once the user selects the photo they want to use, the website automatically opens the Crop page, where the user can cut the image using the crop frame. Users can manually adjust the crop frame or choose to use one of the predefined options available on the website.
After setting the cropping, the user can adjust the brightness and contrast using the options available on the website to ensure that the photo meets the requirements of the selected country. The website also provides a zoom option to check the details of the photo and make sure that it meets the specifications.
When the user is satisfied with the edited photo, they can click on the “Make Photo” button to create the final passport photo. The website generates the passport photo based on the selected country and photo type, ensuring that it meets all of the relevant standards.
Therefore, uploading a photo to IDPhoto4You is a straightforward process that enables users to create their own passport photos quickly and easily. By following the step-by-step instructions provided by the website, users can ensure that their photo meets the required standards and is suitable for use as a passport, visa, or ID photo.
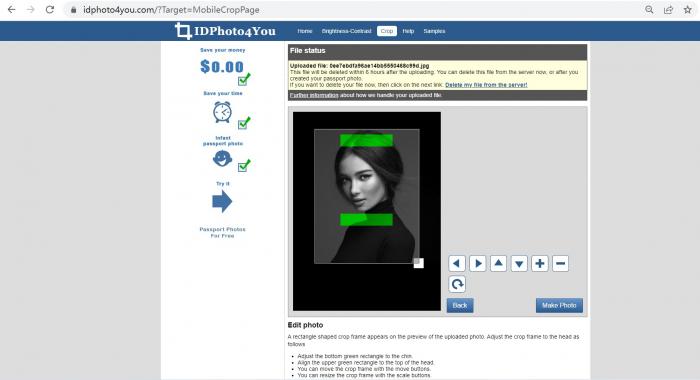
Cropping Your Photo
Steps on how to crop your photo using the IDPhoto4You website.
After uploading a photo to IDPhoto4You, the next step is to crop it to match the requirements for a passport, visa, or ID photo. The website provides a Crop page with a crop frame to help users make the necessary edits to their photos. Here are the steps to follow when cropping a photo on IDPhoto4You:
1. Upload the photo: The first step is to upload the photo that you want to use for your passport, visa, or ID photo. After uploading the photo, the Crop page will open automatically.
2. Adjust the crop frame: The crop frame shows the recommended area of the photo that should be used for a passport, visa, or ID photo. Users can move and resize the frame by dragging and dropping it over the image.
3. Set the cropping: After adjusting the crop frame, users need to set the cropping by clicking the “Make Photo” button. This will apply the crop and create your passport photo.
4. Download the photo: Once the passport photo is generated, users can download it and print it or send it to a photo lab for printing.
The importance of proper cropping and guidelines to ensure a correct cut.
Proper cropping is essential when creating a passport, visa, or ID photo. These documents require a specific type of photo with distinct measurements, positioning, and background. Failing to follow the guidelines can result in a rejected application or a delay in processing time. Therefore, it’s crucial to ensure that your photo meets these standards.
IDPhoto4You website follows the guidelines and requirements for passport, visa, and ID photos from 73 countries worldwide. The website’s crop frame provides users with a visual guide on how to crop their photos correctly, and the cropping tool applies the necessary formatting automatically.
It’s important to ensure that your photo meets the required dimensions, which vary from one country to another. The position of the subject and the background must comply with the regulations as well. For example, some countries require a neutral background or a specific head position. Users must follow these guidelines to avoid having their photos rejected.
Therefore, cropping a photo is a crucial step in creating a passport, visa, or ID photo. Following the guidelines, dimensions, position, and background requirements is critical to ensure that your photo is acceptable for your document application. With IDPhoto4You, users can create their passport photos with ease and confidence that their photos will meet the necessary standards.
Adjusting the Lighting and Contrast
How to properly adjust the lighting and contrast of your passport photo.
Proper lighting and contrast adjustments are crucial in creating a high-quality passport, visa, or ID photo. IDPhoto4You provides users with an intuitive and easy-to-use tool that allows them to adjust the brightness and contrast of their photos to match the necessary standards.
When adjusting the lighting, it’s advisable to increase the brightness by half of the value of the contrast. However, decreasing the contrast can lead to image quality degradation, except when editing an overexposed photo. Users can use the sliders provided by the website to adjust the brightness and contrast of their images. It’s essential to note that the adjustments made won’t be realized if the user leaves the page without using the “Next” button.
In-depth instructions on how to edit the photo for the best possible quality.
To achieve the best possible quality for passport, visa, and ID photos, users need to perform in-depth edits on their images. First, the user needs to upload the photo to the IDPhoto4You website. On the website, users can crop their photos according to the guidelines, and then adjust the brightness and contrast of the image using the sliders provided. After making the necessary adjustments, users can click on the “Make Photo” button to generate a preview of their passport photo.
If the user isn’t satisfied with the result, they can continue to fine-tune the image by adjusting other factors like the saturation, sharpness, or shadows. The IDPhoto4You website provides users with the necessary tools to adjust these aspects and see the changes instantly. It’s essential to preview the photo to ensure that it matches the specifications for a passport, visa, or ID photo.
Once the user is satisfied with the edits, they can download the photo to their device and print it or send it to a photo lab for printing. It’s important to note that the website supports multiple print sizes, allowing users to choose the size that matches their requirements.
Therefore, adjusting the lighting and contrast of a passport, visa, or ID photo is critical in achieving high-quality results. IDPhoto4You provides users with an intuitive and easy-to-use interface that allows them to fine-tune their images to meet the necessary standards. It’s advisable to follow the guidelines and specifications for passport, visa, and ID photos to avoid having the application rejected. With IDPhoto4You, creating passport photos that meet these requirements is easy and straightforward.
Applying Special Effects (Optional)
Advice on special effects that can be added to your passport photo.
IDPhoto4You provides users with the option of applying special effects to their passport photo to enhance its quality. Although these steps are optional, they can make a difference in the overall look of the picture. Here are a few tips on the special effects that can be added to your passport photo:
1. Adjust brightness and contrast: Depending on the lighting and camera used to take the photo, the brightness and contrast may need to be adjusted. IDPhoto4You allows users to tweak these settings to improve the clarity and visibility of the picture.
2. Apply a filter: Applying a filter can alter the color and tone of the photo, giving it a different look. Users can choose from a variety of filters, including black and white, sepia, and vintage, to add more character to their passport photo.
3. Add a vignette: A vignette is a dark border that surrounds the edges of a photo, giving it a classic look. Users can adjust the size and intensity of the vignette to add more depth and contrast to their passport photo.
Optional steps to enhance your photo quality.
Aside from the special effects, there are a few more optional steps that users can take to enhance the quality of their passport photo. These steps include:
1. Choose the right image: Before applying special effects or cropping a photo, it’s important to choose the right image. Make sure the photo is clear, in focus, and well-lit. Avoid using blurry or pixelated images that may not meet the standards required for a passport, visa, or ID photo.
2. Use a neutral background: A neutral background, such as white or off-white, is preferred for passport, visa, and ID photos. Avoid using busy backgrounds or patterns that may distract from the subject.
3. Use high-quality printing: Once you’ve created your passport photo, make sure to use high-quality printing to ensure that the photo is crisp and clear. Avoid printing on low-quality paper or using a printer that produces low-quality images.
Therefore, while the special effects and optional steps are not necessary, they can add a touch of personalization and enhance the overall quality of your passport photo. By following the guidelines and using IDPhoto4You’s easy-to-use tool, users can create a passport photo that meets the necessary standards while also reflecting their unique style.
Finalizing and Downloading your Passport Photo
The last steps in making your passport photo with IDPhoto4You
Once you have made all the necessary adjustments to your passport photo using IDPhoto4You’s easy-to-use tool, it’s time to finalize the photo and download it to your device. Here are the last steps you need to take:
1. Check the specifications: Before finalizing your passport photo, make sure to double-check the specifications required for the country you’ll be using it in. IDPhoto4You offers standards for 73 countries, so you can be sure that your passport photo meets the necessary requirements.
2. Preview the photo: After making all the necessary adjustments, preview the photo to ensure that it meets the standards required for a passport, visa, or ID photo. Make sure that the face is centered and that the background is neutral.
3. Download the photo: Once you are satisfied with the preview, click on the “Download” button to download the photo to your device. IDPhoto4You offers multiple print sizes so you can choose the one that best suits your needs.
Instructions on how to finalize your photo and download it to your device
To finalize your passport photo and download it to your device, follow these simple steps:
1. Click on the “Finish and download” button: Once you have made all the necessary adjustments, click on the “Finish and download” button located at the bottom of the screen.
2. Choose your print size: IDPhoto4You offers multiple print sizes for your passport photo. Choose the one that best suits your needs.
3. Preview the photo: Preview the photo to ensure that it meets the requirements for a passport, visa, or ID photo. Check that the face is centered and that the background is neutral.
4. Download the photo: Once you are satisfied with the preview, click on the “Download” button to download the photo to your device.
Therefore, IDPhoto4You is an easy-to-use tool that allows you to create a passport, visa, or ID photo that meets the necessary requirements. By following the step-by-step guide and using the optional special effects and additional steps, you can personalize your passport photo while also ensuring that it meets the necessary standards. So the next time you need a passport photo, don’t hesitate to use IDPhoto4You’s free online service!
Printing
Printing your passport photo so that it meets all the necessary requirements.
After creating your perfect passport photo using IDPhoto4You, the next step is printing it. Printing your passport photo properly is crucial since it will determine whether your photo meets all the necessary requirements. Here are a few steps to follow to ensure that your passport photo is printed correctly:
1. Choose the right paper: The paper you print your passport photo on should be high-quality and preferably glossy. Avoid using low-quality paper since it can affect the clarity and visibility of the photo.
2. Use the right printer: When printing your passport photo, it’s important to use a printer that produces high-quality images. If possible, use a printer designed specifically for printing photographs.
3. Adjust the printer settings: Make sure to adjust your printer settings to match the print size of your passport photo. IDPhoto4You offers multiple print sizes, so choose the size that matches the requirements of your country.
Steps on how to print your passport photo properly.
1. Download your photo: After creating your passport photo on IDPhoto4You, download the photo to your computer.
2. Choose the right paper: As mentioned earlier, choose a high-quality, glossy paper for printing.
3. Adjust the printer settings: To ensure that your passport photo is printed at the correct size, adjust your printer settings to match the print size you selected on IDPhoto4You.
4. Print the photo: Once you’ve adjusted your printer settings, print the photo. Make sure to check the quality of the image before cutting it to the correct size.
5. Cut the photo: Use a sharp pair of scissors to cut your passport photo to the correct size. Make sure to follow the guidelines provided by IDPhoto4You for your country.
Printing your passport photo may seem like a simple task, but it’s important to get it right to meet the necessary requirements. By following the steps provided above, you can ensure that your passport photo is printed accurately and to the highest quality.
Conclusion and FAQs
A summary of IDPhoto4You and its benefits.
IDPhoto4You is an easy-to-use online tool that allows users to create passport, visa, and ID photos quickly and easily. The tool is free of charge and offers multiple print sizes to meet the requirements of 73 countries. With the simple picture mode, users can prepare photos for CVs, social media accounts, or any online applications. IDPhoto4You is the perfect tool for creating passport photos of children, including infants and babies.
Not only does IDPhoto4You offer manual crop, but users can also adjust brightness and contrast to ensure their passport photo is of high quality. With over 11 million passport photos created for over 11 million users in the past eleven years, IDPhoto4You is a trusted source for creating passport photos.
Answers to frequently asked questions about passport photo creation with the online tool.
Q: Is IDPhoto4You free to use?
A: Yes, the online tool is completely free to use.
Q: How many print sizes are available?
A: IDPhoto4You offers multiple print sizes to meet the requirements of 73 countries.
Q: Can I use the tool to create photos for social media accounts?
A: Yes, the simple picture mode makes it easy to prepare photos for any online applications, including social media accounts.
Q: Does IDPhoto4You offer manual crop?
A: Yes, users can manually crop their photos to ensure they meet the required size.
Q: Can I adjust the brightness and contrast of my photo?
A: Yes, IDPhoto4You allows users to adjust the brightness and contrast of their photos to ensure their passport photo is of high quality.
Q: Is IDPhoto4You suitable for creating passport photos of children, including infants and babies?
A: Yes, IDPhoto4You is perfectly suitable for creating passport photos of children of all ages.
So, IDPhoto4You is a free and easy-to-use online tool that offers multiple print sizes and allows users to create high-quality passport, visa, and ID photos. The tool also offers manual crop and allows users to adjust the brightness and contrast of their photos. With over 11 million passport photos created for over 11 million users in the past eleven years, IDPhoto4You is a trusted source for creating passport photos.


