how to make a smart trashcan using arduino
The Smart Dustbin using Arduino Ultrasonic Sensor & Servo Motor is a useful project designed and developed for the easy disposal of waste. This project is aimed at automating the process of opening the lid of the dustbin whenever it senses the presence of an object like a human hand, allowing users to dispose of their waste without the need to touch the dustbin’s lid manually.
Overview of the project and the components needed
The concept behind this project is object detection, where the Ultrasonic Sensor is placed on top of the dustbin’s lid, and when it detects an object like a human hand, it sends a signal to the Arduino board, which then triggers the Servo Motor to open the lid.
The Smart Dustbin using Arduino only requires three main components for its design and development. These include:
1. Arduino Uno: This is the microcontroller board that controls the entire system. It’s responsible for processing the data from the Ultrasonic Sensor and controlling the Servo Motor.
2. HC-SR04 Ultrasonic Sensor Module: This sensor is used to detect the presence of an object near the dustbin and sends a signal to the Arduino board.
3. TowerPro SG90 Servo Motor: This motor is used to open and close the lid of the dustbin. It’s connected to the Arduino board and controlled by it.
Other necessary items include connecting wires, a 5V power supply, and a small dustbin with a hinged lid. Miscellaneous items like glue and plastic tubing may also be needed for the assembly process, depending on the specific design.
Circuit Diagram and Code
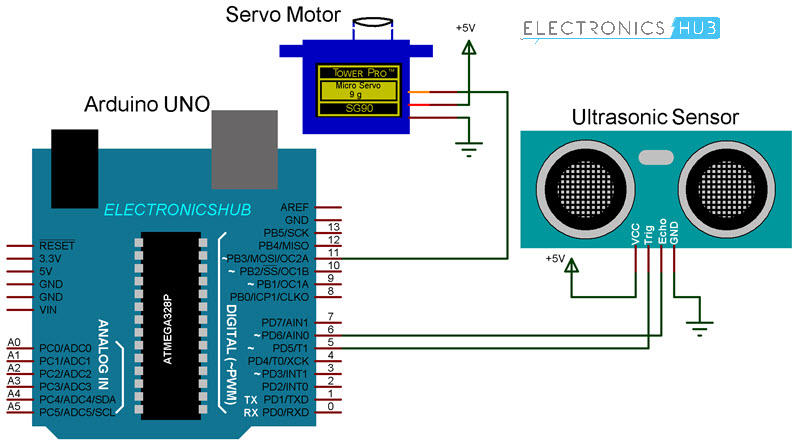
The circuit diagram for the Smart Dustbin using Arduino is straightforward and involves only two components other than the Arduino board. The Ultrasonic Sensor is connected to the Arduino board’s digital pins, while the Servo Motor is connected to the board’s PWM (Pulse Width Modulation) pin.
The code for the project is also simple and easy to understand, and it’s available online for free. It’s written in Arduino IDE language and involves the use of various libraries and functions.
Benefits of Smart Dustbin using Arduino
The Smart Dustbin using Arduino is beneficial in many ways, including:
– It promotes hygiene by eliminating the need to touch the lid of the dustbin manually, which reduces the risk of contamination from germs and bacteria.
– It saves time and effort by automatically opening and closing the lid of the dustbin, which is especially beneficial for people with disabilities or limited mobility.
– It’s environmentally friendly, as it encourages proper waste disposal and prevents littering.
– It’s cost-effective since it requires only a few components, and it can be easily assembled by anyone with basic knowledge of programming and electronics.
Overall, the Smart Dustbin using Arduino Ultrasonic Sensor & Servo Motor is an innovative project that can promote cleanliness, convenience, and environmental sustainability. With its simple design and cost-effectiveness, it’s an ideal solution for households, offices, and public places.
Getting Started with Arduino
Setting up the Arduino IDE and connecting components to the board
For those who want to dip their toes into the world of smart homes and IoT, building a trash indicator with Arduino and BLE is a great starting point. The project is simple, easy to follow, and doesn’t require extensive knowledge in coding. Here are the steps to get started:
1. Download and install the Arduino IDE from the official website.
2. Connect the Arduino board to your computer using a USB cable.
3. Open the Arduino IDE and choose the correct board and port from the Tools menu.
4. Install the BLE library by going to Sketch > Include Library > Manage Libraries and searching for “BLE Peripheral.”
5. Download the code from the Instructables tutorial and upload it to the Arduino board.
Once the setup is complete, it’s time to connect the components to the board. The trash indicator requires an ultrasonic sensor, a servo motor, LEDs, and a Bluetooth module. Follow these steps:
1. Connect the ultrasonic sensor’s VCC pin to the 5V pin on the Arduino board. Connect the GND pin to the GND pin on the board, and the Trig and Echo pins to pins 8 and 9, respectively.
2. Connect the servo motor’s signal pin to pin 6, the VCC pin to 5V, and the GND pin to GND.
3. Connect the LEDs’ anode pins to pins 2, 3, and 4 and the cathode pins to GND.
4. Connect the Bluetooth module’s VCC pin to 5V, the GND pin to GND, the Rx pin to pin 10, and the Tx pin to pin 11.
Using bullet points, the tutorial explains the steps to test the trash indicator and app:
– Turn on the Bluetooth on your smartphone and download the app provided in the tutorial.
– Once the app is installed, open it and click on the Bluetooth icon. The Arduino board should show up on the list of BLE devices. Select it and connect.
– As you fill the trash bin, the ultrasonic sensor will detect the distance and send the data to the app. The LED lights will change colors to indicate the level of trash in the bin.
– When the bin is full, the app will send a notification to remind you to take out the trash.
Overall, building a smart home device with Arduino is not only a fun project but also a practical one. With the rise of IoT, having the knowledge to build and customize electronic devices can be beneficial for a range of applications.
Designing the Smart Trashcan
Choosing the materials and tools for building the trashcan
Building a smart trashcan might seem like a complex project, but with the right tools and materials, it can be done easily and with impressive results. The project showcased in the previous section used an ultrasonic sensor and a servo motor to create a self-opening trashcan. Here are the materials and tools needed to build it:
Materials:
– Ultrasonic Sensor
– Standard Servo Motor
– Arduino Board
– Breadboard
– Jumper Wires
– 2x 9V Batteries + Battery Snaps
– Crafting Materials (e.g. cardboard, foam, tape, scissors)
The ultrasonic sensor is the main component of the project. It works by sending an ultrasonic sound and listening for its echo to determine the distance between itself and an object. The servo motor is used to control the lid of the trashcan. The Arduino board serves as the brain of the project, controlling the sensor and the motor, while the breadboard is used to connect the components together.
Tools:
– Soldering Iron
– Wire Strippers
– Pliers
– Screwdriver
– Glue Gun
The tools needed are fairly common, but a soldering iron might be necessary to connect some of the components together. Wire strippers and pliers are useful for removing insulation from wires and bending them as needed. A screwdriver can be used to attach the servo motor to the lid of the trashcan, while a glue gun can be used to secure the sensor into place.
Building the Smart Trashcan
To build the smart trashcan, follow these steps:
1. Design the trashcan using the crafting materials at hand. In the previously showcased project, cardboard and a piece of grey foam mattress were used as the building materials. Create holes on the side of the trash can and attach the servo’s shaft to the lid.
2. Connect the components together according to the diagram below. The ultrasonic sensor’s VCC pin should be connected to the positive terminal of one 9V battery, while the servo motor’s VCC pin should be connected to the positive terminal of another 9V battery. The GND pins of both components should be connected to the negative terminals of the batteries. The Arduino board should be powered by a USB cable connected to a computer.

3. Upload the code to the Arduino board. The code should be written in the Arduino IDE and uploaded using a USB cable connected to the computer.
4. Test the smart trashcan by filling it with trash. As the distance between the ultrasonic sensor and the trash decreases, the servo motor should open the lid. When the trashcan is empty, the lid should remain closed.
Building a smart trashcan is not only a fun project, but it can also be a practical addition to any home or office. With the right materials and tools, the project can be done in a few hours and provide an excellent introduction to the world of smart home devices.
Adding Ultrasonic Sensor
Connecting the ultrasonic sensor to the Arduino and testing the readings
The ultrasonic sensor is a crucial component of the trash indicator with Arduino. It uses sound waves to measure the distance between the sensor and the trash, enabling the device to detect when the bin is full. In this blog post, we will look at how to add an ultrasonic sensor to an existing trash can project and test its readings.
To begin, you need to create holes on the side of the trash can to mount the ultrasonic sensor. The ultrasonic sensor has four pins – VCC, GND, Trig, and Echo. Connect the VCC pin to the 5V pin on the Arduino board using a jumper wire. Connect the GND pin to the ground pin on the board. Then, connect the Trig pin to pin 8, and the Echo pin to pin 9 on the board.
Before testing the readings, we need to write a code that will read the distance between the sensor and the trash. To test the readings, we will use the serial monitor in the Arduino IDE. Open the IDE and go to Tools > Serial Monitor. Ensure that the baud rate is set to 9600. Then, copy and paste the following code into the IDE:
“`
const int trigPin = 8;
const int echoPin = 9;
long duration;
int distance;
void setup() {
pinMode(trigPin, OUTPUT);
pinMode(echoPin, INPUT);
Serial.begin(9600);
}
void loop() {
digitalWrite(trigPin, LOW);
delayMicroseconds(2);
digitalWrite(trigPin, HIGH);
delayMicroseconds(10);
digitalWrite(trigPin, LOW);
duration = pulseIn(echoPin, HIGH);
distance = duration * 0.034 / 2;
Serial.print(“Distance: “);
Serial.println(distance);
delay(500);
}
“`
The above code sets up the ultrasonic sensor and reads the distance between the sensor and the trash. Upload the code to the Arduino board and open the Serial monitor. As you fill the trash can, the distance displayed on the monitor should decrease, indicating that the trash can is getting full.
Therefore, adding an ultrasonic sensor to a trash can project is a simple process that enhances its functionality. Using the code above, you can test the readings and adjust the sensor’s position for accurate measurements.
Adding Servo Motor
Connecting the servo motor to the Arduino and writing the code for controlling the motor
To further enhance the trash indicator with Arduino project, a servo motor can be added to physically indicate when the trash is full. In this blog post, we will look at how to connect a servo motor to an Arduino board and write a code to control its movement.
To begin, you will need an Arduino board, a servo motor, a 10k ohm potentiometer, hook-up wires, and a power source. Servo motors have three wires: power, ground, and signal. The power wire is typically red and should be connected to the positive pole (+) of your power source. Connecting a servo directly to the board can damage the board, so it’s essential to connect the power source first.
The potentiometer will be used to control the position of the servo motor. In the knob example, connect the two outer pins of the potentiometer to power (+5V) and ground. Connect the middle pin to A0 on the board. Then, connect the servo motor as shown in the circuit below:
|
Knob Circuit |
Sweep Circuit |
|---|---|
|
|
|


The above circuit shows the connections for the potentiometer and servo motor in the knob example. In the sweep example, connect the servo motor as shown above.
Once the hardware is connected correctly, the next step is to write the code that will control the servo motor’s movement. The is a great library for controlling servo motors. In this article, we will cover two easy examples that can be used by any Arduino board.
In the first example, we will control the position of an RC (hobby) servo motor with the Arduino and a potentiometer. Copy and paste the following code into the Arduino IDE:
“`
#include
Servo myservo;
int potpin = A0; // analog pin used to connect the potentiometer
int val; // variable to read the value from the analog pin
void setup() {
myservo.attach(9); // attaches the servo on pin 9 to the servo object
}
void loop() {
val = analogRead(potpin); // reads the value of the potentiometer (value between 0 and 1023)
val = map(val, 0, 1023, 0, 179); // scale it to use it with the servo (value between 0 and 180)
myservo.write(val); // sets the servo position according to the scaled value
delay(15); // waits for the servo to get there
}
“`
The above code uses the Servo library to control the position of the servo motor. Upload the code to the Arduino board, and the servo motor should move when the potentiometer is turned.
In the second example, we will sweep the shaft of an RC servo motor back and forth across 180 degrees. Copy and paste the following code into the Arduino IDE:
“`
#include
Servo myservo;
void setup() {
myservo.attach(9); // attaches the servo on pin 9 to the servo object
}
void loop() {
for (int pos = 0; pos
= 0; pos -= 1) { // goes from 180 degrees to 0 degrees
myservo.write(pos); // tell servo to go to position in variable ‘pos’
delay(15); // waits 15ms for the servo to reach the position
}
}
“`
The above code uses the Servo library to sweep the shaft of the servo motor back and forth across 180 degrees. Upload the code to the Arduino board, and the servo motor should move back and forth.
Therefore, adding a servo motor to a trash indicator with Arduino project is a great way to physically indicate when the trash is full. With the code examples above and the correct hardware connections, controlling a servo motor with an Arduino board is a straightforward process.
Writing the Arduino Code
Code explanation and implementation for the smart trashcan
Now that we have added the ultrasonic sensor to our trash can project and tested its readings, it’s time to write the Arduino code to control the servo motor and trigger the trash can lid to open when it’s full.
To begin, we need to define the pins where the servo motor and ultrasonic sensor are connected. We will also need to create a variable to store the distance read by the sensor and set a threshold distance at which the servo motor will be triggered to open the lid.
“`
#include
const int trigPin = 8;
const int echoPin = 9;
long duration;
int distance;
int servoPin = 3;
Servo myservo;
int threshold = 25;
“`
In the `setup()` function, we need to initialize the servo and ultrasonic sensor pins as inputs and outputs and set the servo’s initial position to closed.
“`
void setup() {
pinMode(trigPin, OUTPUT);
pinMode(echoPin, INPUT);
myservo.attach(servoPin);
myservo.write(0);
Serial.begin(9600);
}
“`
In the `loop()` function, we need to read the distance from the ultrasonic sensor and compare it to the threshold. If the distance is less than the threshold, the servo motor will be triggered to open the lid. We will also add a delay to avoid constant triggering of the servo motor when the trash can is not full.
“`
void loop() {
digitalWrite(trigPin, LOW);
delayMicroseconds(2);
digitalWrite(trigPin, HIGH);
delayMicroseconds(10);
digitalWrite(trigPin, LOW);
duration = pulseIn(echoPin, HIGH);
distance = duration * 0.034 / 2;
Serial.print(“Distance: “);
Serial.println(distance);
if (distance
<= threshold) {
myservo.write(90);
delay(1000);
myservo.write(0);
delay(1000);
}
delay(500);
}
“`
In the above code, when the distance is less than or equal to the threshold, the `myservo.write(90)` command opens the trash can lid, and the `delay(1000)` command keeps it open for a second. The `myservo.write(0)` command then closes the lid, and the `delay(1000)` command keeps it closed for a second.
Once you have finished writing your code, upload it to the Arduino board and test your smart trash can. As you fill the trash can, the ultrasonic sensor will detect when it's full, and the servo motor will trigger to open the lid for you.
In conclusion, with the addition of an ultrasonic sensor and a servo motor, you can make your trash can smart and save time filling it. Using the code above and following the instructions given, you can implement your own smart trash can with ease.
Installing the Circuit and Components
Mounting the ultrasonic sensor, servo motor, and other components inside the trashcan
After you have gathered all the necessary materials and written the Arduino code, it’s time to install the circuit and components inside the trashcan. You can use cardboard or any other material to make the trashcan. In our project, we used a piece of cardboard and a grey foam mattress to make the structure of the trashcan.
To start, we need to make holes on the side of the trashcan to mount the ultrasonic sensor and servo motor. Ensure that they are in a position where they will detect the trash when it’s full and trigger the servo motor to open the lid.
Once the holes are made, mount the ultrasonic sensor and servo motor using a foam tape or any other adhesive. To avoid interference from other objects, mount the ultrasonic sensor facing downwards towards the bottom of the trashcan. Connect the servo motor’s shaft to the trashcan lid so that when the motor turns, it opens the lid.
Next, we need to connect the circuit on the breadboard. Place the Arduino board on the breadboard and make sure it’s secure. Connect the components using jumper wires as indicated in the Arduino code. Use 2x 9V batteries and battery snaps to power the Arduino and servo motor separately.
Check your connections to ensure they are correct and double-check the wiring connections of the ultrasonic sensor and servo motor to the Arduino board.
After you have installed the circuit and components, turn on the Arduino board, and test if the ultrasonic sensor is detecting objects correctly. As you fill the trashcan, the ultrasonic sensor should pick up the presence of trash, and the servo motor should trigger to open the lid.
With these steps followed, your smart trashcan project is complete, and you can now place it in any convenient location in your home or workspace. Say goodbye to the hassle of manually opening your trashcan every time and embrace the benefits of an efficient, smart trashcan.
Therefore, with a few simple steps, you can make your trashcan smarter and more efficient by installing an ultrasonic sensor and a servo motor. Assembling the circuit and components inside the trashcan might be a little challenging, but with the help of the Arduino code and this blog post, you can create your own smart trashcan in no time.
Testing the Smart Trashcan
Testing the smart trashcan and fine-tuning its functionality
Now that the Arduino code is written and uploaded, it is important to test the functionality of the smart trashcan and make any necessary adjustments to ensure it works properly.
To test the smart trashcan, follow these steps:
1. Power up the Arduino board using the 9V batteries.
2. Set up the trashcan in a suitable location.
3. Fill up the trashcan with some trash until it reaches the threshold distance.
4. Once the distance is less than or equal to the threshold, the servo motor will open the lid of the trashcan.
5. Observe the functionality of the smart trashcan and check if it needs any adjustments.
During testing, it’s essential to observe the behavior of the smart trashcan and make any necessary adjustments. If the sensor is not reading properly or the servo motor is not working correctly, check the connections for any loose or faulty wiring.
If the behavior of the smart trashcan is not as expected, try adjusting the threshold distance. Changing this value in the code allows the user to control how full the trashcan needs to be before the servo motor is triggered to open the lid.
It is also a good idea to test the smart trashcan with different types of trash to ensure it works reliably in all situations. After testing, fine-tune the threshold distance to ensure that the smart trashcan is working according to your requirements.
Therefore, testing and fine-tuning the smart trashcan is essential to ensure that it works properly and reliably. With the addition of an ultrasonic sensor and a servo motor, creating a smart trashcan is a fun and straightforward DIY project that can help save time and effort in our daily lives. Using the guidelines above, anyone can create their own smart trashcan for home or office use.
Testing the Smart Trashcan
Testing the smart trashcan and fine-tuning its functionality
After writing and uploading the Arduino code, the smart trashcan needs to be tested to ensure proper functionality. The testing of the smart trashcan can be done by following these simple steps:
1. Power up the Arduino board using the 9V batteries.
2. Set up the trashcan in a suitable location.
3. Fill up the trashcan with some trash until it reaches the threshold distance.
4. Once the distance is less than or equal to the threshold, the servo motor will open the lid of the trashcan.
5. Observe the functionality of the smart trashcan and check if it needs any adjustments.
During testing, it is vital to observe the behavior of the smart trashcan and make any necessary adjustments. If the sensor is not reading properly or the servo motor is not working correctly, check the connections for any loose or faulty wiring.
In case the behavior of the smart trashcan is not as expected, try adjusting the threshold distance. Changing this value in the code allows the user to control how full the trashcan needs to be before the servo motor is triggered to open the lid.
It is also advisable to test the smart trashcan with different types of trash to ensure it works reliably in all situations. After testing, fine-tune the threshold distance to ensure that the smart trashcan is working as per the requirements.
Therefore, testing and fine-tuning the smart trashcan is essential to ensure it works properly and reliably. With the addition of an ultrasonic sensor and a servo motor, creating a smart trashcan is a fun and straightforward DIY project that can help save time and effort in our daily lives.
Summary of the project and future improvements
Creating a smart trashcan using an ultrasonic sensor and a servo motor is a cost-effective DIY project that can be beneficial in the long run. By testing and fine-tuning the functionality of the trashcan while creating it, it is highly likely that the project will be successful.
In the future, improvements can be made to the smart trashcan by incorporating features like machine learning algorithms to detect toxicity, and also a camera for visual sensing. These additional features can help convert the smart trashcan into a fully automated waste sorting system.
So, creating a smart trashcan using an ultrasonic sensor and a servo motor is a fun and easy DIY project that can help save time and effort in our daily lives. With proper testing and fine-tuning, anyone can create their version of the smart trashcan with improved features to make the process even more seamless.
Conclusion
Therefore, creating a smart trashcan using an ultrasonic sensor and a servo motor is a fun and straightforward DIY project. By carefully following the steps mentioned above and testing the functionality of the trashcan, one can create an efficient waste disposal system at home or in the office. With improvements like machine learning algorithms or visual sensing, the smart trashcan concept can be taken further. Overall, with the help of technology, even mundane tasks like trash disposal can be made faster and more efficient.


