how to transfer photos between android devices without losing timestamps
In today’s fast-paced world, smartphones have become an integral part of our lives, and most of us use them to capture our cherished memories. With time, the number of photos on our phones keeps increasing, and we often need to transfer them to another device to free up storage space or share them with loved ones. However, when it comes to transferring photos between Android devices, preserving timestamps is crucial. This blog post explains the importance of preserving timestamps and common methods for transferring photos between Android devices.
Importance of preserving timestamps when transferring photos between Android devices
When we capture a photo, the image contains metadata, known as EXIF data, that includes information on the date, time, and location the photo was taken. When we transfer photos between devices, preserving this metadata is essential as it helps organize and sort photos correctly. However, when we transfer photos between Android devices, we may encounter an issue where the timestamps get updated to the current date and time. This happens because the Date Modified tag on the photos gets updated to the day they were transferred to the PC, and Android gallery apps interpret this tag instead of the correct EXIF data (Date Taken). Hence, preserving timestamps ensures that we keep our photos organized by the date they were taken.
Common methods used for transferring photos between Android devices
There are several methods for transferring photos between Android devices. However, some methods update the timestamps, which we want to avoid. Here are some common methods used for transferring photos between Android devices:
Method 1: MTP Connection
MTP (Media Transfer Protocol) connection is a common way to transfer files between Android devices and a PC. However, as discussed earlier, it may update the timestamps of the photos. This happens because of the way Windows interprets the Date Modified tag on the files.
Method 2: Cloud Services
Cloud services like Google Photos, Dropbox, or OneDrive are a convenient way to transfer photos between Android devices. They allow us to upload photos to the cloud and access them from any device. However, the downside is that this method requires an internet connection, and the transfer speed may depend on the internet speed.
Method 3: Bluetooth
Bluetooth is another way to transfer photos between two Android devices. However, the transfer speed is relatively slow, and it may not be suitable for transferring large files like videos or multiple images.
Method 4: Direct Transfer using Airdrop or Shareit
Direct transfer using apps like Airdrop or Shareit is a convenient way to transfer photos between two Android devices without updating the timestamps. It is an excellent option for those who want to transfer photos quickly and without an internet connection.
Therefore, preserving timestamps when transferring photos between Android devices is important for organizing and sorting photos correctly. While there are several methods available for transferring photos, it is crucial to choose a method that preserves the timestamps and avoids updating them to the current date and time.
Transfer Photos via Bluetooth
Transferring photos from one Android device to another can be done easily through Bluetooth connectivity. This is one of the most commonly used methods for photo transfer and works on almost every Android device that is currently being used. Here are the steps to transfer photos from one Android device to another using Bluetooth:
Selecting multiple photos to transfer via Bluetooth
Before transferring photos using Bluetooth, it is important to select the photos that you want to transfer. This can be done by using the built-in file manager in Android or by using a third-party file manager app. Follow these steps to select multiple photos for transfer:
1. Open the file manager app on your Android device
2. Navigate to the folder where your photos are stored
3. Press and hold the first photo you want to transfer
4. Tap on the other photos you want to transfer to select them
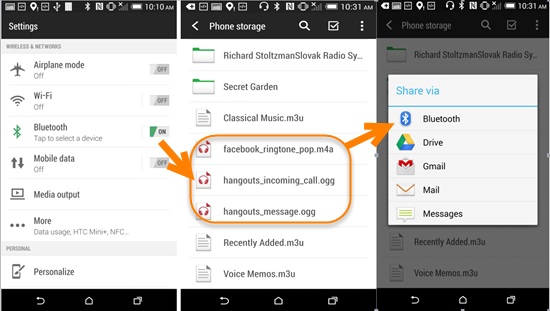
5. Once you have selected all the photos you want to transfer, tap on the “Share” icon
Ensuring both Android devices are connected to Bluetooth
Once you have selected the photos you want to transfer, you need to ensure that both Android devices are connected to Bluetooth. Follow these steps to connect both Android devices to Bluetooth:
1. Go to “Settings” on both Android devices
2. Turn on Bluetooth on both devices
3. Pair both devices by tapping on the other device’s name when it shows up in the list of available devices.
Limitations and drawbacks of using Bluetooth for photo transfer
While Bluetooth is a fast and easy way to transfer photos between two Android devices, it has some limitations and drawbacks that should be considered. For example:
1. Bluetooth has a limited range, which means that both devices need to be within close proximity to each other for the transfer to work
2. Bluetooth transfer speeds can be slow compared to other methods of transfer, such as using a USB cable or cloud storage
3. The size of the photos being transferred can affect transfer speeds and may cause the transfer to take longer than expected.
Therefore, transferring photos from one Android device to another using Bluetooth is a simple and easy method that works on most devices. However, it is important to keep in mind the limitations and drawbacks of using Bluetooth and choose the best method of transfer for your needs.
Use a File Manager App
Transferring photos from one Android device to another can be done in various ways. One of the best ways is to use a file manager app to locate and transfer photos. Here are some steps to transfer photos using a file manager app:
Using a file manager app to locate and transfer photos
1. Install a file manager app on your Android device if you don’t already have one.
2. Open the file manager app and navigate to the folder where your photos are stored.
3. Press and hold the first photo you want to transfer and then tap on additional photos to select them.
4. After selecting all the photos you want to transfer, tap on the “Share” icon.
5. Choose the transfer method from the options given – you can choose to send via Bluetooth or share via Wi-Fi.
Transferring photos to SD card or external storage to preserve timestamps
Sometimes, it’s important to preserve the timestamps of your photos when transferring from one device to another. You can do this by transferring your photos to an SD card or external storage. Here is how:
1. Insert an SD card into the Android device where your photos are stored.
2. Open the file manager app and select the photos you want to transfer.
3. Tap on the “Move” icon and transfer the photos to the SD card.
4. Remove the SD card from your device and insert it into the Android device where you want to transfer the photos.
5. Open the file manager app and select the photos on the SD card.
6. Tap on the “Move” icon and transfer the photos to your device.
Ensuring both Android devices have compatible file manager apps
It’s important to ensure that both Android devices have compatible file manager apps when transferring photos. If one device has a different file manager app, the transfer may not be successful. Here are some tips to ensure compatibility:
1. Use the same file manager app on both devices to ensure compatibility.
2. If you are using different apps, make sure that both apps can “See” each other’s folders.
3. Make sure that both devices have the same version of the file manager app.
Therefore, transferring photos between Android devices is made easy with file manager apps. Whether you want to use Bluetooth, Wi-Fi, or an SD card, file manager apps can help you transfer your photos quickly and easily. By following the steps provided above, you can ensure that the transfer is successful and the timestamps of your photos are preserved.
Transfer Photos via USB cable
Another common method for transferring photos from one Android device to another is by using a USB cable. This method is often preferred as it is faster than using Bluetooth and does not require an internet connection. Here are the steps to transfer photos from one Android device to another via USB cable:
Connecting both Android devices via USB cable
The first step in transferring photos via USB cable is to connect both Android devices to the computer using a USB cable. Follow these steps to connect both devices:
1. Connect one end of the USB cable to the first Android device and the other end to the computer.
2. Connect the second Android device to the computer using another USB cable.
Enabling USB debugging on both devices
Next, you need to enable USB debugging on both Android devices. USB debugging allows for easier communication between the Android device and the computer. Here are the steps to enable USB debugging:
1. On both Android devices, go to “Settings”
2. Scroll down and tap on “About Phone” or “About Device”
3. Tap on “Software Info”
4. Find the “Build Number” and tap on it seven times until it says “You are now a developer”
5. Go back to “Settings” and tap on “Developer Options”
6. Turn on “USB Debugging”
Transferring photos using the Android File Transfer software
After connecting both Android devices and enabling USB debugging, you can start transferring photos. Here are the steps to transfer photos using the Android File Transfer software:
1. Download and install the Android File Transfer software on your computer
2. Open the Android File Transfer software
3. On the left-hand side of the screen, navigate to where your photos are stored on the first Android device
4. Select the photos you want to transfer by clicking and dragging over them
5. Drag the selected photos to a folder on your computer
6. Disconnect the first Android device and connect the second Android device to the computer
7. Navigate to the folder where you saved the photos on your computer
8. Select the photos you want to transfer and drag them to the second Android device folder
Therefore, transferring photos from one Android device to another via USB cable is a fast and convenient method that does not require an internet connection. However, it does require a computer and can be more complicated than transferring photos via Bluetooth. Consider the pros and cons of each method and choose the best one that suits your needs.
Transfer Photos via Cloud Services
Uploading and storing photos on cloud services like Google Photos, Dropbox, or iCloud has become increasingly popular due to their convenience and accessibility. Transferring photos between Android devices through cloud services is not only fast, but it also allows users to organize their photos in a central location. Here are the steps to transfer photos from one Android device to another via cloud services:
Uploading photos to cloud storage platforms like Google Photos or Dropbox
1. Open the cloud storage app on the original Android device.
2. Select the photos and videos you wish to transfer, and then tap upload.
3. The app will automatically save the photos on the cloud storage platform, and they will be accessible on any device linked to your account.
Downloading photos onto the new Android device from the cloud
1. Open the cloud storage platform app on the new Android device.
2. Sign in to your account to access stored photos.
3. Select the photos or videos you want to transfer, and then tap download.
Ensuring a reliable internet connection for smooth transfer
Transferring photos using cloud storage platforms requires a stable internet connection to prevent transfer interruptions. Make sure both devices are connected to the internet before initiating the transfer process. Also, transfer time may vary depending on the size of the files and internet speed.
Therefore, transferring photos between Android devices can be done through various methods, including USB cables and cloud storage platforms. Each method has its pros and cons, and the best option depends on the user’s preference and circumstance. Nonetheless, using cloud storage services provides a convenient and secure way of transferring and storing photos while maintaining accessibility across different devices.
Zipping Photos Before Transfer
One common issue when transferring photos between Android devices is the potential loss of the original timestamps. This can make it difficult to organize photos and can be frustrating for users. However, there is a simple solution to this problem. By compressing the photos into a zip file before transferring them, the original timestamps can be preserved.
Compressing photos using file compression software
Android devices do not come with built-in file compression software, so users will need to download a third-party file explorer that is capable of creating zip files. One recommended option is the MiXplorer app, which has a built-in plug-in for creating zip files. Other file explorers may also have similar functionality.
Here are the steps to compress photos into a zip file:
1. Open the file explorer app and navigate to the folder where the photos are stored
2. Select all of the photos that you want to transfer
3. Tap the “compress” or “zip” button in the file explorer app. If using MiXplorer, select the “Archive” option and choose the zip file format.
4. The app will create a new zip file containing the selected photos.
Sending the compressed file via Bluetooth, email, or file transfer app
Once the photos have been compressed into a zip file, they can be transferred to another Android device using various methods such as Bluetooth, email, or another file transfer app.
To transfer the zip file via Bluetooth, follow these steps:
1. On the first Android device, turn on Bluetooth and make sure it is visible to other devices
2. On the second Android device, turn on Bluetooth and search for available devices
3. Select the first Android device from the list of available devices and pair the two devices
4. On the first Android device, select the compressed zip file and choose the “share” option
5. Select “Bluetooth” and choose the second Android device as the recipient
6. Accept the incoming file transfer on the second Android device
To transfer the zip file via email, follow these steps:
1. On the first Android device, open a new email
2. Attach the compressed zip file to the email
3. Send the email to the second Android device
4. Open the email on the second Android device and download the attached zip file
Preserving timestamps while also reducing photo size
Compressing photos into a zip file not only preserves the original timestamps but also reduces the overall file size. This can be helpful when transferring large numbers of photos or when there are storage limitations on the receiving device.
By following these steps, users can successfully transfer photos between Android devices while preserving the original timestamps. Additionally, compressing the photos into a zip file can make the transfer process faster and more efficient.
Selective Transfer via Third-Party Apps
In addition to compressing photos into a zip file, users can also consider using third-party apps like SHAREit or Xender for selective transfer. These apps allow users to transfer only the photos they want to transfer, rather than transferring an entire folder.
Downloading apps like SHAREit or Xender for selective transfer
To use these apps for photo transfer, users will need to download and install the app on both the sending and receiving Android devices. These apps are available for free on the Google Play Store.
Ensuring both Android devices have the same app installed
Once both devices have the app installed, users can open the app and follow the on-screen instructions to transfer photos between the devices. It is important to ensure that the same app is installed on both devices, as different apps may have different file compression methods that could affect the preservation of timestamps.
Optimizing the app settings for preserving timestamps
To ensure that timestamps are preserved during the transfer process, users should optimize the app settings for the highest quality transfer. This may include setting the app to transfer files in their original format, rather than compressing them, and ensuring that all metadata is preserved during the transfer process.
Overall, using third-party apps like SHAREit or Xender for selective transfer can be a fast and efficient way to transfer photos between Android devices while preserving timestamps. By ensuring that both devices have the same app installed and optimizing the app settings, users can achieve the best possible transfer results.
Avoiding Conflicts with Duplicate Photos
When transferring photos between Android devices, it can be easy to accidentally create duplicate photos. These duplicates not only take up unnecessary storage space but can also cause confusion when organizing and managing photos. To avoid these conflicts, users can follow a few simple steps.
Preventing duplicate photos when transferring from one Android device to another
One of the main causes of duplicate photos is transferring the same photos multiple times from one device to another. To prevent these duplicates, users can use a file transfer app that automatically detects and skips duplicate files during the transfer process. Some recommended options include SHAREit and Send Anywhere.
Here are the steps to transfer photos without duplicates:
1. Install a file transfer app on both Android devices
2. On the sending device, select the photos that you want to transfer and choose the “share” option
3. Select the file transfer app as the destination and start the transfer process
4. On the receiving device, accept the incoming file transfer and ensure that the duplicate file detection feature is enabled
Using a duplicate photo finder app to remove duplicate photos
If duplicate photos have already been created, users can use a duplicate photo finder app to locate and remove them. There are several options available for Android devices, including Remo Duplicate Photos Remover and Duplicate Photos Fixer Pro.
Here are the steps to remove duplicate photos using an app:
1. Download and install a duplicate photo finder app from the Google Play store
2. Open the app and select the folders that you want to scan for duplicates
3. Start the scan and wait for the app to identify any duplicate files
4. Review the list of duplicate photos and select the ones that you want to delete
5. Confirm the deletion process and allow the app to remove the selected photos
Resolving synchronization issues between different cloud storage accounts
When using cloud storage platforms like Google Drive or Dropbox, it is possible to create conflicts when synchronizing photos between different accounts or devices. This can result in duplicate files being created or existing files being overwritten. To prevent these synchronization issues, users can follow a few guidelines.
Here are the steps to avoid synchronization conflicts:
1. Use the same cloud storage account on all devices to ensure synchronization consistency
2. Ensure that all devices are configured to upload new photos to the cloud storage account automatically
3. Avoid moving or deleting photos within the cloud storage account, as this can cause synchronization issues
4. If synchronization conflicts do occur, make sure to resolve them promptly by selecting the correct file version or restoring deleted files from the recycle bin.
By following these steps, users can easily avoid conflicts with duplicate photos when transferring or synchronizing photos between Android devices. This can help to keep their photo collections organized and efficient, and prevent unnecessary storage usage.
Avoiding Conflicts with Duplicate Photos
When it comes to transferring photos between Android devices, it’s important to be cautious and avoid creating duplicate photos. Not only can they take up unnecessary storage space, but they can also make it difficult to organize and manage your photos effectively. Fortunately, there are several ways to prevent duplicate photos from being created during the transfer process.
Preventing duplicate photos when transferring from one Android device to another
One effective method for preventing duplicate photos is to use a file transfer app that automatically detects and skips duplicate files. Two popular options for this are SHAREit and Send Anywhere. To use these apps, follow these simple steps:
1. Install a file transfer app on both Android devices.
2. On the device you want to transfer photos from, select the photos you want to transfer and choose the “share” option.
3. Select the file transfer app as the destination and begin the transfer.
4. On the receiving device, accept the incoming file transfer and make sure that the duplicate file detection feature is enabled.
Using a duplicate photo finder app to remove duplicate photos
If duplicate photos have already been created and transferred, you can use a duplicate photo finder app to locate and remove them. Popular options for this include Remo Duplicate Photos Remover and Duplicate Photos Fixer Pro. To remove duplicate photos using these apps, follow these steps:
1. Download and install a duplicate photo finder app from the Google Play store.
2. Open the app and select the folders you want to scan for duplicates.
3. Start the scan and wait for the app to identify any duplicate files.
4. Review the list of duplicate photos and select the ones you want to delete.
5. Confirm the deletion process and allow the app to remove the selected photos.
Resolving synchronization issues between different cloud storage accounts
When using cloud storage platforms like Google Drive or Dropbox, it’s important to avoid creating conflicts when synchronizing photos between different accounts or devices. To prevent these synchronization issues, follow these guidelines:
1. Use the same cloud storage account on all devices to ensure synchronization consistency.
2. Make sure all devices are configured to upload new photos to the cloud storage account automatically.
3. Avoid moving or deleting photos within the cloud storage account, as this can cause synchronization issues.
4. If synchronization conflicts do occur, promptly resolve them by selecting the correct file version or restoring deleted files from the recycle bin.
Summary of the various methods for transferring photos between Android devices while preserving timestamps
To summarize, there are several methods for transferring photos between Android devices while preserving timestamps and avoiding conflicts with duplicate photos. These methods include using file transfer apps that detect and skip duplicates, using duplicate photo finder apps to remove duplicates, and avoiding synchronization issues between different cloud storage accounts.
Tips on choosing the best method for your individual needs and preferences
When it comes to choosing the best method for transferring photos between Android devices, it’s important to consider your individual needs and preferences. For example, some users may prefer to use a specific app or storage platform, while others may prioritize ease of use or speed of transfer. By taking these factors into account, you can choose the method that works best for you and ensure that your photo collection remains well-organized and efficient.
Conclusion
Overall, transferring photos between Android devices can be a simple and stress-free process when done correctly. By following the steps outlined in this article, you can avoid creating duplicate photos, prevent synchronization issues, and preserve timestamps to keep your photo collection well-organized and efficient. Choose the method that works best for you and enjoy hassle-free photo transfers on your Android devices.


